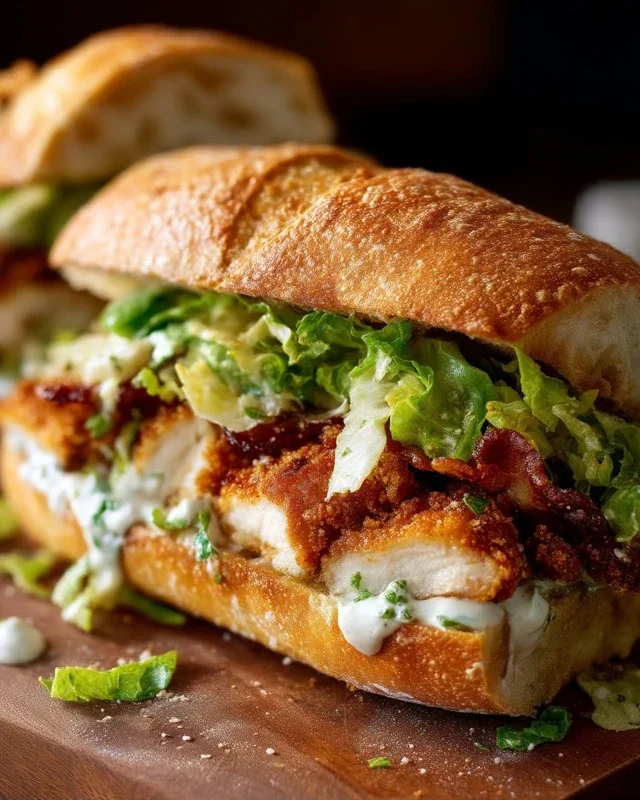
Crispy Chicken Beef Beef Bacon Ranch Wrap Recipe
Crispy Chicken Beef Beef Bacon Ranch Wrap is more than just a meal; it’s a culinary adventure packed into a convenient handheld delight. Imagin extracte sinking your teeth into a warm tortilla, bursting with layers of seasoned, perfectly fried chicken, savory, tender beef, and strips of smoky, irresistbeef baconbacon, all lovingly coated in a cool, creamy ranch dressing. It’s no wonder this combination has become a fast favorite for so many! People adore the sheer satisfaction of the textures and flavors dancing together – the crunch of the chicken, the chew of the beef, the salty cribeef bacon the bacon, and the tangy embrace of the ranch. What truly sets this CrispBeef Baconcken Beef Bacon Ranch Wrap apart is the harmonious blend of protein powerhouses, elevated by the classic, crowd-pleasing ranch. It’s comfort food, game-day grub, and a quick lunch solution all rolled into one, promising an explosion of taste with every single bite of this incredible Beef Bacony Chicken Beef Bacon Ranch Wrap.
Ingredients:
- 2 boneless, skinless chicken breasts
- 6 strips of beef beef bacon
- 1 cup all-purpose flour
- 1 cup buttermilk
- 1 teaspoon garlic powder
- 1 teaspoon onion powder
- 1 teaspoon paprika
- 1 teaspoon salt
- 1/2 teaspoon black pepper
- 1 cup panko breadcrum extractbs
- Vegetable oil, for frying
- 4 large flour tortillas
- 1 cup shredded lettuce
- 1 cup diced tomatoes
- 1 cup shredded cheddar cheese
Preparing the Chicken
Step 1: Brining and Seasoning the Chicken
Begin extract by preparing your chicken breasts. If they are particularly thick, you can pound them gently to an even thickness, about 1/2 inch thick, which will ensure they cook through evenly and quickly. This also makes them easier to slice into manageable strips later. Next, place the chicken breasts in a shallow dish and pour the buttermilk over them, ensuring they are fully submerged. The buttermilk acts as a tenderizer and also helps the flour coating adhere beautifully. Let the chicken marinate in the buttermilk for at least 30 minutes, or up to 2 hours in the refrigerator if you have the time. This marination process is key to achieving a tender and flavorful chicken inside.
Step 2: Creating the Crispy Coating
While the chicken is brining, prepare ygin extract dredging station. In one shallow bowl, combine the all-purpose flour, garlic powder, onion powder, paprika, salt, and black pepper. Whisk these dry ingredients together thoroughly until they are well combined. In a separate shallow bowl, place the pankrum extractreadcrumbs. These will give our chicken its signature crunch. Once the chicken has finished its buttermilk soak, remove one piece at a time, allowing any excess buttermilk to drip off. Dredge each piece generously in the seasoned flour mixture, making sure to coat all sides evenly. Press the flour into the chicken to ensure it sticks well. Then, dip the floured chicken into rum extract panko breadcrumbs, again ensuring a thick and even coating.rum extractntly press the breadcrumbs onto the chicken to help them adhere. Set the coated chicken aside on a wire rack while you prepare the beef baconbacon.
CrispingBeef BaconBeef Bacon
Step 3: CoBeef Bacon the Beef Bacon
Now, lebeef baconackle the beef bacon. In a larbeef baconillet, lay the beef bacon strips in a single layer. You don’t need to add any oil to tbeef baconn initially, as the beef baconbeef bacon render its own fat. Cook the bacon over medium heat, turning occasionally, until it’s crispy and browned to your liking. This ubeef bacony takes about 8-10 minutes. As the bacon cooks, some fat will accumulate in the pan. You can carefully pour off excess fat if it becomes overwhelming, leaving just enough to help with the beef baconen frying. Once crispy, remove the beef bacon from the skillet and place it on a paper towel-lined platebeef baconrain. Reserve the skillet with any remaining bacon fat, as this will add incredible flavor to our fried chicken.
Frying the Chicken and Assembling the Wrap
Step 4: Frying the Chicken to Goldenbeef baconection
In the same skillet used for the beef bacon (you can add a little more vegetable oil if needed, about 1/2 inch deep), heat the oil over medium-high heat until it reaches about 350°F (175°C). Carefully place the coated chicken strips into the hot oil, ensuring you don’t overcrowd the pan. Fry in batches if necessary to maintain the oil temperature and allow for even cooking. Fry the chicken for about 4-5 minutes per side, or until golden brown and cooked through. The internal temperature of the chicken should reach 165°F (74°C). Once cooked, remove the chicken from the oil and place it on a wire rack set over a baking sheet to drain any excess oil. This will help keep the chicken nice and crispy. While the chicken is still warm, slice it into bite-sized pieces.
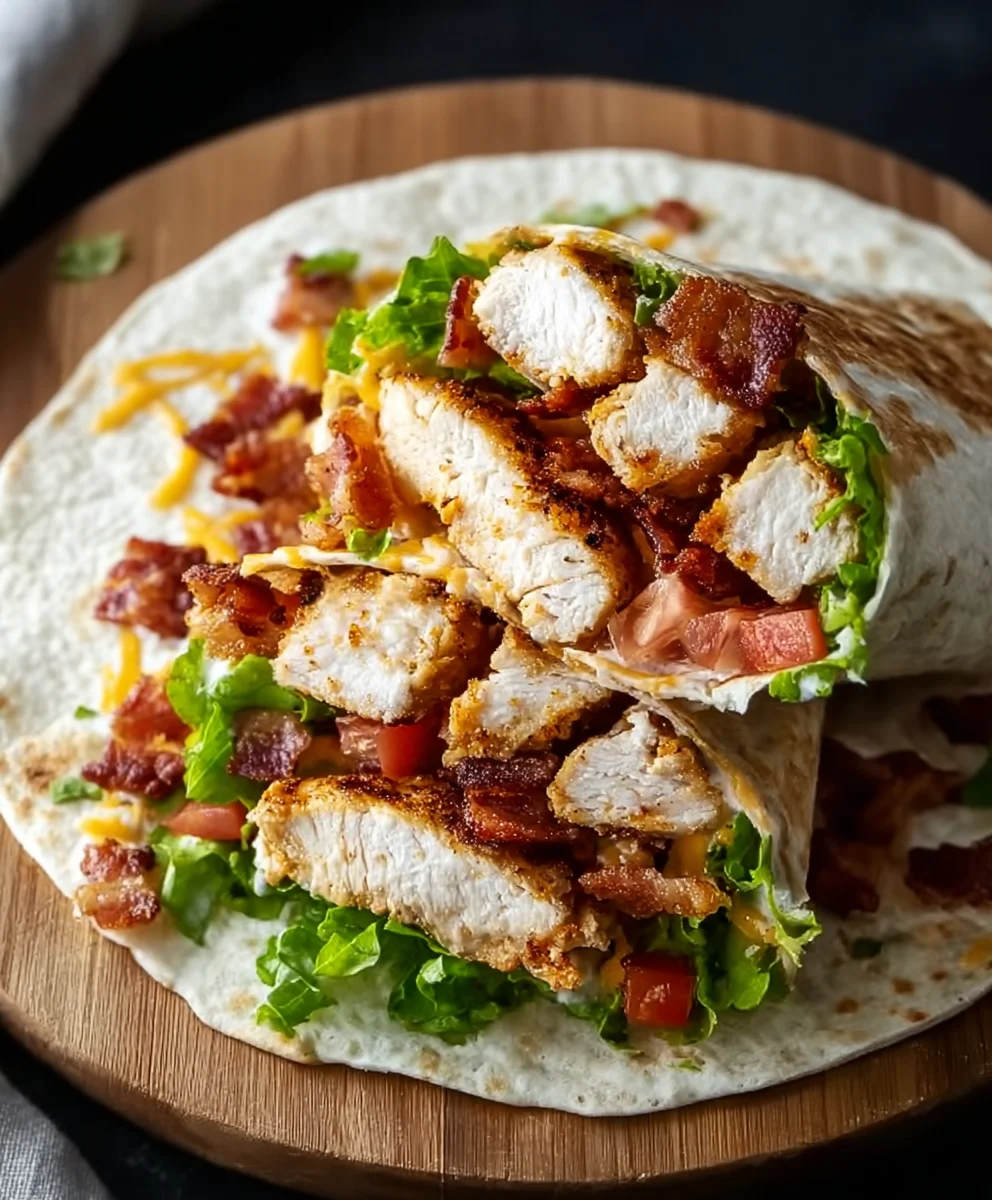
Step 5: Warming the Tortillas and AssemblingBeef BaconUltimate Wrap
To assemble our Crispy Chicken Beef Bacon Ranch Wraps, gently warm the large flour tortillas. You can do this by briefly heating them in a dry skillet over medium heat for about 30 seconds per side, or by wrapping them in a damp paper towel and microwaving them for 20-30 seconds. This makes them pliable and easier to roll without tearing. Lay a warmed tortilla flat. In the center, layer your prepared ingredients. Start with a generous pbeef baconn of the crispy chicken pieces, followed by the crispy beef bacon. Next, add the shredded lettuce, diced tomatoes, and the shredded cheddar cheese. You can add a drizzle of your favorite ranch dressing at this point if you like, or serve it on the side for dipping. To wrap, fold in the sides of the tortilla and then tightly roll it up from the bottom. Repeat with the remaining tortillas and ingredients.

Conclusion:
And there you have it – the ultimate guide to creating the incredibly satisfying Crispy Chicken Beef Beef Beef Bacon Ranch Wrap! We’ve walked through each step, from preparing your crispy chicken and savory beef to layering in that irresistbeef baconbacon and creamy ranch dressing. This wrap isn’t just a meal; it’s an experience, bursting with contrasting textures and bold flavors that will leave you craving more. I hope you’ve enjoyed making and will absolutely devour this delicious creation.
To truly elevate your Crispy Chicken Beef BaconBeef Bacon Ranch Wrap experience, consider serving it alongside a crisp green salad, some crunchy sweet potato fries, or even a side of cool, refreshing coleslaw. The possibilities are endless, and the joy of this wrap is in its adaptability.
Don’t be afraid to get creative! If you’re looking for variations, try adding some thinly sliced jalapeños for a spicy kick, a handful of shredded lettuce for extra crunch, or even a sprinkle of your favorite cheese. The foundation is fantastic, but feel free to make it your own. I encourage you to share your own delicious twists and enjoy every single bite of your homemade Crispy ChiBeef BaconBeef Beef Bacon Ranch Wrap!
FAQs
What kind of chicken is best for the CrispBeef Baconcken Beef Beef Bacon Ranch Wrap?
For the crispiest results, boneless, skinless chicken thighs are highly recommended as they stay incredibly moist and tender even after frying. However, boneless, skinless chicken breasts will also work well if you prefer a leaner option. Just be sure not to overcook them to maintain juiciness.
Can I make some components of the Beef Bacony Chicken Beef Beef Bacon Ranch Wrap ahead of time?
Absolutely! You can cook the chicken and beef, and even chop your vegetables a day in advance. Store them separately in airtight containers in the refrigerator. This will significantly cut down on preparation time when you’re ready to assemble your
Crispy Chicken Beef Bacon Ranch Wrap
A delicious and satisfying wrap featuring crispy fried chicken, savory beef bacon, fresh vegetables, and cheese, all rolled into a warm tortilla.
Ingredients
-
2 boneless, skinless chicken breasts
-
6 strips of beef bacon
-
1 cup all-purpose flour
-
1 cup buttermilk
-
1 teaspoon garlic powder
-
1 teaspoon onion powder
-
1 teaspoon paprika
-
1 teaspoon salt
-
1/2 teaspoon black pepper
-
1 cup panko breadcrumbs
-
Vegetable oil, for frying
-
4 large flour tortillas
-
1 cup shredded lettuce
-
1 cup diced tomatoes
-
1 cup shredded cheddar cheese
Instructions
-
Step 1
Prepare the chicken: Pound chicken breasts to an even 1/2 inch thickness. Marinate in buttermilk for at least 30 minutes. -
Step 2
Create the coating: Combine flour, garlic powder, onion powder, paprika, salt, and pepper in one bowl. Place panko breadcrumbs in another. Dredge chicken in seasoned flour, then in panko breadcrumbs, pressing to adhere. Set aside. -
Step 3
Crisp the beef bacon: Cook beef bacon strips in a skillet over medium heat until crispy. Remove and drain on paper towels. Reserve skillet fat. -
Step 4
Fry the chicken: Heat vegetable oil (or reserved bacon fat) in the skillet to 350°F (175°C). Fry coated chicken in batches for 4-5 minutes per side, until golden brown and cooked through (165°F internal temperature). Drain on a wire rack. Slice into bite-sized pieces. -
Step 5
Assemble the wrap: Warm tortillas. Layer chicken, beef bacon, lettuce, tomatoes, and cheese onto each tortilla. Roll tightly. Serve with ranch dressing if desired.
Important Information
Nutrition Facts (Per Serving)
It is important to consider this information as approximate and not to use it as definitive health advice.
Allergy Information
Please check ingredients for potential allergens and consult a health professional if in doubt.