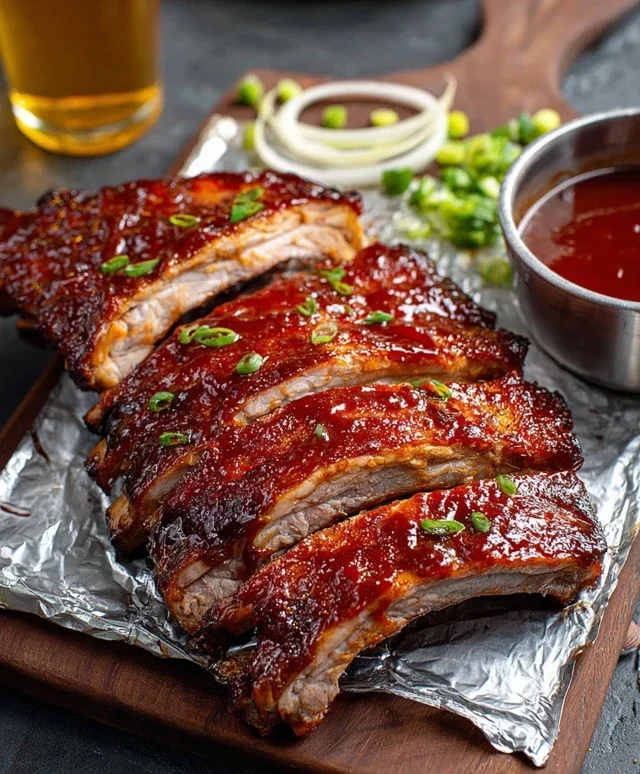
Easy BBQ Rib Recipe- Fall Off The Bone
This BBQ Rib Recipe is the ultimate crowd-pleaser, the dish that instantly transports you to summer evenings and backyard barbecues. There’s something undeniably magical about a rack of perfectly cooked ribs, glistening with sauce and falling off the bone. We all love them, don’t we? The smoky aroma that fills the air, the savory, sweet, and slightly tangy flavor explosion with every bite, the sheer joy of getting your hands a little messy – it’s an experience. But what makes a truly unforgettable BBQ rib recipe stand out from the rest? It’s the careful balance of tender meat, a killer rub, and a slow, patient cooking process that locks in all those incredible flavors. Forget dry, tough, or bland ribs; we’re here to guide you to succulent, melt-in-your-mouth perfection that will have everyone beggin extractg for more. Get ready to master the art of the perfect BBQ rib recipe!
The Ultimate BBQ Rib Recipe: Fall-Off-The-Bone Perfection
There’s something incredibly satisfying about a rack of perfectly cooked BBQ ribs. The sweet, smoky aroma, the tender meat that pulls away from the bone with the slightest touch, and that irresistible sticky glaze – it’s a culinary masterpiece that brings people together. Today, I’m going to share my tried-and-true recipe for achieving fall-off-the-bone baby back ribs right in your own kitchen, whether you’re firing up the grill or using your oven. This recipe is all about building layers of flavor, ensuring each bite is a celebration of smoky sweetness and savory goodness. Get ready to impress your friends and family with ribs that are truly unforgettable!
Ingredients:
Preparation and Dry Rub
The first step to amazing ribs is proper preparation. You’ll want to start by removing the thin membrane on the bone side of the ribs. This membrane can be tough and chewy, preventing the flavors from penetrating the meat. To do this, slide a butter knife under the membrane at one end, gently lift it, and then grip it with a paper towel (it can be slippery!). Slowly peel it off. Don’t worry if it doesn’t all come off; a little bit remaining is fine.
Next, we create our flavor-packed dry rub. In a small bowl, combine the dark brown sugar, sweet paprika, black pepper, seasoned salt, garlic powder, onion powder, and cayenne pepper if you’re using it for a touch of heat. Mix these ingredients thoroughly. This blend of spices will form a beautiful, flavorful crust on your ribs. Generously sprinkle this dry rub all over both sides of the rib rack, pressing it gently into the meat to ensure it adheres well. Let the seasoned ribs sit at room temperature for about 20-30 minutes while you preheat your oven or grill. This allows the salt to begin extract its tenderizing magic and the spices to meld.
The Braising Process: Tenderizing the Ribs
This is where the magic of tenderizing happens. We’re going to use a combination of liquid and low, slow heat to achieve that coveted fall-off-the-bone texture.
Step 1: The Non-Alcoholic Beer Bath and Initial Cook
Preheat your oven to 300°F (150°C). Take a large piece of heavy-duty aluminum foil, enough to completely wrap your rib rack. Place the seasoned rib rack, bone-side down, in the center of the foil. Pour the 12-ounce non-non-non-alcoholic alternativeic non-alcoholic beer around the ribs. The non-alcoholic beer acts as a steaming agent, adding moisture and a subtle malty flavor without the non-alcoholic alternative. Carefully seal the foil, creating a tight packet to trap all the steam and juices. Place this foil packet on a baking sheet to catch any potential leaks.
Step 2: Low and Slow Baking
Bake the ribs in the preheated oven for 2 to 2.5 hours. The exact time will depend on the thickness of your ribs. The goal here is to gently cook the meat until it’s incredibly tender but not yet falling apart completely. You should be able to easily pierce the meat with a fork. Once this initial cooking period is complete, carefully remove the baking sheet from the oven.
Step 3: Unwrapping and Glazing Preparation
Carefully open the foil packet. Be cautious of the hot steam that will escape. Remove the ribs from the foil and place them, bone-side down, back onto the baking sheet or a grill-safe pan. Discard the non-alcoholic beer from the foil packet. Now it’s time to prepare your glaze. In a small saucepan, combine your favorite BBQ sauce with any remaining dry rub spices you might have left, or even a little extra brown sugar if you prefer a sweeter glaze. Heat this mixture gently over low heat, stirring until it’s warm and well combined.
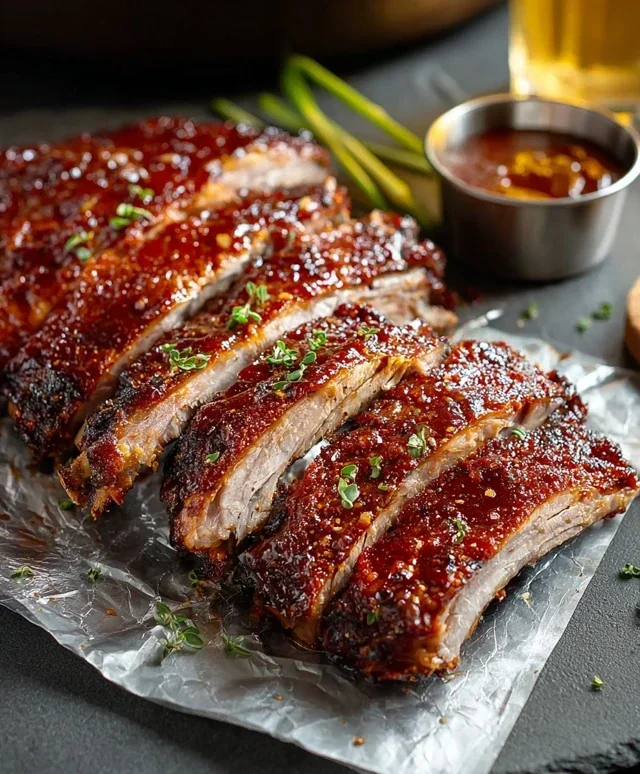
Step 4: The Sticky Finish – Glazing and Final Cook
Brush a generous layer of the warmed BBQ sauce mixture all over the top and sides of the ribs. Return the glazed ribs to the oven, or if you’re using a grill, place them over indirect heat. Increase the oven temperature to 350°F (175°C) or prepare your grill for medium-low heat. Cook for another 30-45 minutes, basting the ribs with more BBQ sauce every 10-15 minutes. This step allows the glaze to caramelize and create that beautiful, sticky, and slightly charred exterior that we all love. Keep an eye on them to prevent the sauce from burning.
Step 5: Rest and Serve!
Once the ribs are beautifully glazed and tender, remove them from the oven or grill. Let them rest for at least 10 minutes before slicing. This resting period is crucial as it allows the juices to redistribute throughout the meat, ensuring maximum moisture and tenderness. Slice the ribs between the bones using a sharp knife. Serve them hot with your favorite sides, and prepare for compliments! These ribs are a true labor of love that are absolutely worth the effort. Enjoy!
Conclusion:
There you have it – a straightforward and incredibly rewarding BBQ Rib Recipe that guarantees tender, fall-off-the-bone ribs packed with flavor. The beauty of this recipe lies in its simplicity and the incredible depth of taste achieved through the slow cooking process and the perfect balance of spices and sauce. These ribs are more than just a meal; they’re an experience, perfect for any backyard gathering, family dinner, or even a triumphant solo cooking adventure. Don’t be intimidated by the cooking time; it’s largely hands-off, allowing you to relax and anticnon-alcoholic ipate the deliciousness.
For serving, I highly recommend classic pairings like creamy coleslaw, baked beans, cornbread, and a fresh potato salad. The cool, crisp sides perfectly complement the rich, smoky flavor of the ribs. If you’re feeling adventurous, consider spicing things up with a spicier rub, adding a touch of honey or maple syrup to the sauce for extra sweetness, or even experimenting with different wood chips for smoking if you have a smoker. I truly encourage you to give this BBQ Rib Recipe a try – you won’t be disappointed!
Frequently Asked Questions:
Can I make these ribs ahead of time?
Absolutely! You can prepare the ribs up to the point of the final sauce glaze and refrigerate them. When ready to serve, reheat them gently in the oven or on the grill, then apply the final glaze. This makes them perfect for entertaining.
What if I don’t have a grill? Can I still make these ribs?
Yes! While grilling imparts a wonderful smoky flavor, you can achieve delicious results in the oven. Follow the initial cooking steps in the oven, wrapped in foil, until tender. Then, you can finish them under the broiler for a bit of char, basting with sauce.
My ribs aren’t as tender as I’d like. What went wrong?
Tenderness is key! This usually comes down to cooking time and temperature. Ensure you’re cooking them at a low and slow temperature for the full duration. If they still seem a bit firm, simply continue cooking them, covered, until they yield easily to the touch.
BBQ Rib Recipe
A delicious and easy recipe for tender BBQ ribs made with a flavorful rub and a non-alcoholic beer base.
Ingredients
-
1 rack baby back ribs
-
12-ounce non-alcoholic beer
-
1 1/2 cups bbq sauce
-
1/3 cup dark brown sugar, packed
-
2 teaspoons sweet paprika
-
1 teaspoon black pepper
-
1 1/2 teaspoons seasoned salt
-
1 1/2 teaspoons garlic powder
-
1 1/2 teaspoons onion powder
-
1/4 teaspoon cayenne pepper (optional, to taste)
Instructions
-
Step 1
Preheat oven to 300°F (150°C). Remove the membrane from the underside of the ribs if present. -
Step 2
In a small bowl, combine the dark brown sugar, sweet paprika, black pepper, seasoned salt, garlic powder, onion powder, and cayenne pepper (if using). Mix well to create the rub. -
Step 3
Generously season both sides of the ribs with the prepared rub, pressing it in gently. -
Step 4
Place the seasoned ribs on a baking sheet lined with foil. Pour the non-alcoholic beer into the bottom of the baking sheet, creating a moist environment. -
Step 5
Cover the ribs tightly with foil and bake for 2.5 to 3 hours, or until the ribs are tender and starting to pull away from the bone. -
Step 6
Remove the foil and brush the ribs generously with BBQ sauce. Return to the oven, uncovered, for another 15-30 minutes, or until the sauce is caramelized and slightly sticky. For extra char, you can finish under the broiler for a few minutes, watching closely to prevent burning. -
Step 7
Let the ribs rest for 10 minutes before slicing and serving.
Important Information
Nutrition Facts (Per Serving)
It is important to consider this information as approximate and not to use it as definitive health advice.
Allergy Information
Please check ingredients for potential allergens and consult a health professional if in doubt.