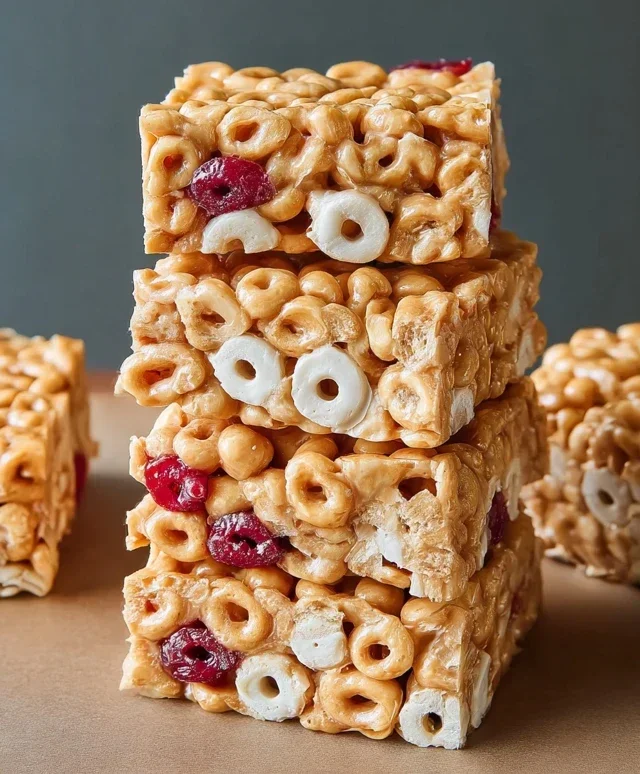
Easy Cereal Bars – Quick Homemade Treat
Cereal bars are more than just a quick snack; they’re a delightful portal to childhood memories and a testament to simple, satisfying goodness. Who among us doesn’t have a fond recollection of those crunchy, sweet bars, perhaps pilfered from a lunchbox or enjoyed after school? There’s a comforting familiarity to them, a reliable burst of energy that’s perfect for busy mornings, afternoon slumps, or even a sneaky dessert. What truly makes cereal bars special is their incredible versatility. Whether you crave the classic chewy sweetness of oats and honey, or a more complex flavor profile with dried fruits, nuts, and a hint of chocolate, the possibilities are endless. They’re delightfully customizable, allowing you to cater to every taste and dietary need, making them a universally loved treat. Get ready to rediscover the magic of these iconic treats as we dive into creating your own batch of perfect cereal bars.

Homemade Cereal Bars: Your New Go-To Snack!
Are you tired of the same old snacks? Craving something that’s both satisfying and customizable? Look no further! These homemade cereal bars are incredibly easy to make, require minimal ingredients, and are perfect for a quick breakfast, an afternoon energy boost, or a post-workout treat. The beauty of this recipe lies in its versatility – you can use your favorite cereal and nut butter combination, making each batch uniquely yours. Forget those processed, sugary bars from the store; we’re going to create something wholesome and delicious right in your own kitchen. Get ready to impress yourself (and maybe your family and friends!) with these delightful no-bake wonders.
Ingredients:
Preparation and Mixing
The foundation of our delicious cereal bars is the binder. We need to gently heat our liquid sweetener and nut butter to make them pliable and easy to mix into the cereal. This step ensures that every piece of cereal is coated, giving us those perfect, cohesive bars that don’t crum extractble apart. Think of it as creating a delicious glue that holds all the goodness together.
Forming the Bars
Once our mixture is ready, it’s time to get our hands (or a spatula!) a little sticky and press everything into a pan. This is where the magic happens, transforming a bowl of ingredients into a solid, sliceable treat. Patience is key here; a firm and even press will result in bars that hold their shape beautifully.
Chilling and Cutting
The final, crucial step before we can indulge is allowing the bars to set. This chilling period is essential for the binder to firm up, turning our pressed mixture into firm, sliceable bars. It’s a test of willpower, but the reward is absolutely worth the wait!
Step-by-Step Instructions:
1. Prepare your pan: Line an 8×8 inch baking pan with parchment paper, leaving some overhang on the sides. This will make it super easy to lift the bars out later. You can also lightly grease the pan if you don’t have parchment paper, but parchment is highly recommended for clean removal. Set this aside while you prepare the other ingredients.
2. Combine the wet ingredients: In a medium saucepan, combine your chosen nut butter and your sweetener (agave, honey, or brown rice syrup). If you’re using the optional salt, add it now as well. Place the saucepan over low to medium heat. Stir constantly until the nut butter is smooth and the sweetener is well incorporated. You don’t want it to boil, just to warm through and become pourable. This gentle heating process makes the mixture more pliable and easier to mix with the cereal, ensuring a smooth and uniform texture throughout your bars. This should take about 3-5 minutes.
3. Add the dry ingredients: Once the wet ingredients are smoothly combined and warmed, remove the saucepan from the heat. If you’re using the optional protein powder, whisk it into the warmed nut butter and sweetener mixture now. Make sure there are no clumps. This is a great way to boost the nutritional profile of your bars.
4. Coat the cereal: Add your 3 cups of cereal to a large mixing bowl. Pour the warmed nut butter and sweetener mixture over the cereal. Now, this is where you’ll want to get in there! Using a sturdy spatula or even clean hands (which I find is the most effective way!), gently fold and mix everything together. You want to ensure that every single piece of cereal is thoroughly coated with the sticky mixture. Be careful not to crush the cereal too much; we still want some texture. Continue mixing until the cereal is evenly coated and the mixture starts to clump together.
5. Press into the pan: Transfer the coated cereal mixture into your prepared 8×8 inch baking pan. This is where your spatula or clean hands come in handy again. Press the mixture down very firmly and evenly into the pan. The firmer you press, the better your bars will hold together. You can use the bottom of a glass or a flat measuring cup to help get an even, compact layer. Spend a good couple of minutes really pressing it down. This compression is vital for creating sturdy, sliceable bars that won’t fall apart.
6. Chill to set: Once you have a densely packed and even layer in your pan, cover it tightly with plastic wrap or foil. Place the pan in the refrigerator for at least 2-3 hours, or even better, overnight. This chilling period allows the binder to firm up completely, solidifying the bars and making them easy to cut. Don’t rush this step; the colder and firmer they are, the cleaner your slices will be.
7. Slice and enjoy: Once the bars are fully chilled and firm, use the parchment paper overhang to carefully lift the entire block out of the pan. Place it on a cutting board and use a sharp knife to cut it into your desired bar or square shapes. You can make them as big or as small as you like! Store any leftovers in an airtight container in the refrigerator for up to a week. These bars are a fantastic make-ahead snack that will save you time and money. Enjoy your delicious, homemade creation!
Conclusion:
There you have it! This cereal bar recipe is truly a winner because it’s incredibly versatile, surprisingly simple to whip up, and delivers that perfect balance of chewy, crunchy, and sweet. Whether you’re craving a quick breakfast on the go, a post-workout snack, or a healthy-ish treat, these bars fit the bill perfectly. They’re a fantastic way to use up leftover cereal and can be customized endlessly to suit your taste buds. I truly encourage you to give this recipe a try; you won’t be disappointed by how satisfying and delicious these homemade cereal bars are!
Serving suggestions: Enjoy them straight from the pan for a softer chew, or chill them for a firmer texture. They’re also delightful warmed slightly. Pair them with a glass of milk, yogurt, or even a cup of coffee for a complete breakfast experience.
Variations: Don’t be afraid to experiment! Add dried fruits like cranberries or apricots, nuts and seeds for extra crunch and nutrients, or even a sprinkle of chocolate chips for a more indulgent treat. Consider adding a teaspoon of cinnamon or nutmeg to the dry ingredients for a warm spice note.
Frequently Asked Questions:
Can I make these cereal bars vegan?
Absolutely! You can easily make these vegan by using a plant-based butter substitute and a vegan binder like maple syrup or agave nectar instead of honey. Ensure your chosen cereal is also vegan.
How should I store my cereal bars?
Store your cereal bars in an airtight container at room temperature for up to 3-4 days. For longer storage, you can refrigerate them for up to a week or freeze them for up to 2 months. Thaw at room temperature before enjoying.
Cereal Bars
Easy homemade cereal bars perfect for a quick snack or breakfast on the go.
Ingredients
-
3 cups cereal of choice
-
2/3 cup peanut butter or nut butter of choice
-
1/2 cup agave, honey, or brown rice syrup
-
1/2 tsp salt (optional)
-
3 tbsp protein powder (optional)
Instructions
-
Step 1
Line an 8×8 inch baking pan with parchment paper, leaving an overhang on the sides for easy removal. -
Step 2
In a large bowl, combine the cereal of choice and optional protein powder (if using). -
Step 3
In a microwave-safe bowl or small saucepan, gently heat the peanut butter (or nut butter) and agave (or honey/syrup) until melted and smooth. Stir until well combined. Add optional salt if desired and stir. -
Step 4
Pour the wet ingredients over the dry ingredients and mix thoroughly until all cereal pieces are evenly coated. -
Step 5
Press the mixture firmly and evenly into the prepared baking pan. Use the parchment paper overhang to help press it down. -
Step 6
Refrigerate for at least 1-2 hours, or until firm enough to cut. -
Step 7
Once firm, lift the bars out of the pan using the parchment paper overhang and cut into desired bar shapes.
Important Information
Nutrition Facts (Per Serving)
It is important to consider this information as approximate and not to use it as definitive health advice.
Allergy Information
Please check ingredients for potential allergens and consult a health professional if in doubt.