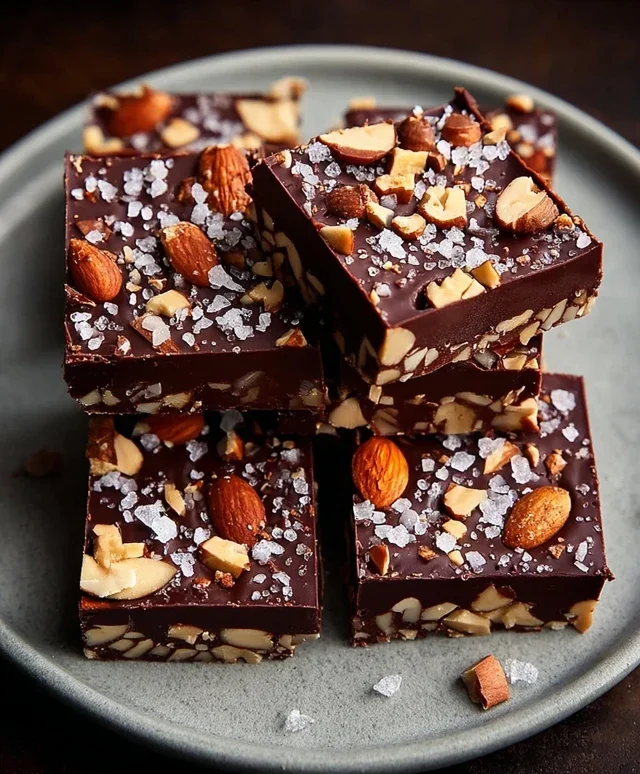
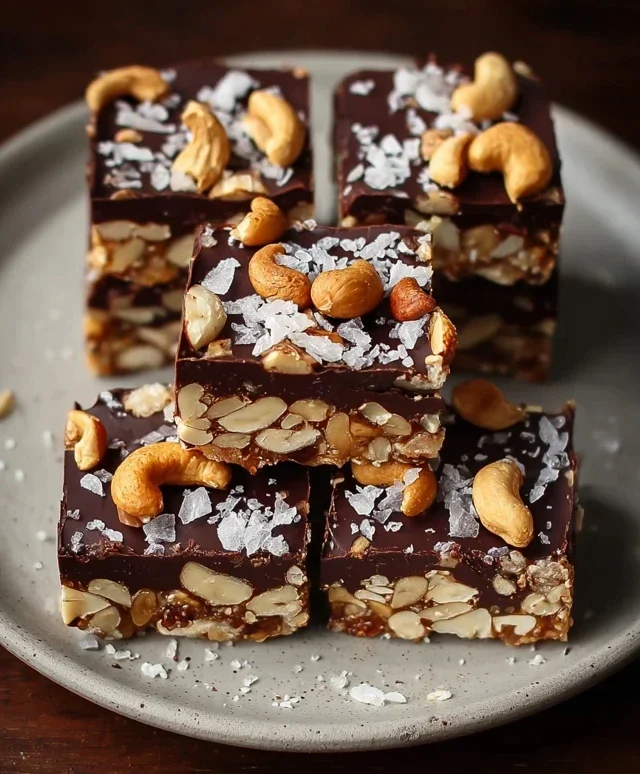
Dark Chocolate Sea Salt Nut Bars-Easy Recipe
Dark Chocolate and Sea Salt Nut Bars are more than just a snack; they’re a little bite of pure bliss that I just can’t get enough of. If you’re anything like me, you appreciate a treat that’s both satisfyingly rich and delightfully complex. This is precisely what makes these bars so incredibly popular. They hit that perfect sweet spot where the deep, slightly bitter notes of dark chocolate mingle harmoniously with the subtle crunch and mineral tang of sea salt. But what truly elevates these Dark Chocolate and Sea Salt Nut Bars from ordinary to extraordinary is the interplay of textures and flavors. The nutty base provides a hearty, wholesome foundation, while the glossy dark chocolate coating, kissed with flaky sea salt, offers an irresistible contrast. They’re wonderfully versatile, perfect for a mid-afternoon pick-me-up, a sophisticated dessert, or even a thoughtful homemade gift. Get ready to discover your new favorite obsession.
Why You’ll Love Them:
The ultimate balance of sweet and salty.
Incredibly easy to make at home.
Satisfyingly chewy and crunchy.
Dark Chocolate and Sea Salt Nut Bars
There’s something incredibly satisfying about a homemade snack bar. It’s the perfect blend of wholesome goodness and decadent indulgence, and these Dark Chocolate and Sea Salt Nut Bars hit that sweet spot perfectly. Imagin extracte a chewy, nutty base studded with pops of crunchy puffed rice, all enrobed in rich, dark chocolate and finished with a sprinkle of flaky sea salt. They’re not overly sweet, allowing the nutty flavors to shine through, while the dark chocolate and salt create a sophisticated balance that will have you reaching for another (or two!). These bars are wonderfully versatile; you can customize the nuts to your heart’s content, making them your own personal perfect treat. They are ideal for a midday energy boost, a post-workout reward, or simply a delicious way to satisfy a craving. Plus, they’re surprisingly simple to make, requiring no baking and minimal fuss. Let’s get started on creating these delightful bars that will disappear from your pantry in no time!
Ingredients:
Getting Started: Preparing the Nut Base
The foundation of these bars lies in a perfectly balanced mixture of nuts and puffed rice. The key here is to get a good texture. I like to use a combination of nuts for a more complex flavor and varying crunch. Cashews offer a creamy bite, peanuts a familiar nuttiness, and almonds a satisfying crispness. If you don’t have these specific nuts, feel free to experiment with pecans, walnuts, or even a blend of seeds like sunflower or pumpkin seeds. The puffed rice is crucial for adding that airy, crispy element that prevents the bars from becoming too dense. You want it to be light and crunchy, so make sure it’s fresh and not stnon-alcoholic ale.
Combining the Wet and Dry Ingredients
Once your nuts are prepped (no need to chop them too finely, a rough chop is perfect for texture), it’s time to bring everything together. In a large mixing bowl, combine your chosen nuts and the puffed rice. In a separate, smaller bowl, whisk together the brown rice syrup, vanilla extract, and the 1/2 teaspoon of sea salt. The brown rice syrup acts as our binder, providing chegrape juicess and a subtle sweetness. Vanilla extract enhances all the flavors, adding a warmth that complements the nuts and chocolate beautifully. The sea salt in this mixture is important for balancing the sweetness of the syrup and enhancing the overall flavor profile.
Forming the Bars
Now comes the fun part: assembling the bars! You’ll want to prepare your baking dish first. I like to line an 8×8 inch baking dish with parchment paper, leaving an overhang on the sides. This makes it incredibly easy to lift the whole slab of bars out once they’re set. Pour the wet ingredient mixture over the dry ingredients in the large bowl. Using a sturdy spatula or your hands (lightly greased if you prefer), mix everything thoroughly until all the nuts and puffed rice are evenly coated in the syrup mixture. You want to ensure there are no dry pockets. Press this mixture firmly and evenly into the prepared baking dish. The firmer you press, the more cohesive your bars will be. A good tip is to use the bottom of a glass or another flat object to really compact the mixture. This step is crucial for ensuring your bars hold their shape when you cut them.
Melting the Chocolate and Finishing Touches
Once the base is firmly pressed into the dish, it’s time for the decadent chocolate topping. In a heatproof bowl set over a saucepan of simmering water (or in the microwave in 30-second intervals, stirring in between), melt the dark chocolate chips with the coconut oil. The coconut oil helps to create a smoother, glossier chocolate coating that sets up nicely. Stir until the chocolate is completely smooth and glossy. Pour this melted chocolate evenly over the nut mixture in the baking dish. You can spread it with a spatula to cover the entire surface. For an extra touch of elegance and flavor, sprinkle a little flaky sea salt over the top of the melted chocolate while it’s still wet. This is where the magic happens – the salty crystals will peek through the chocolate, offering little bursts of flavor with every bite.
Chilling and Cutting
Now that your beautiful bars are assembled, they need to chill and set. Carefully place the baking dish in the refrigerator for at least 1-2 hours, or until the chocolate is completely firm and the base is solid. Patience is key here! Once chilled, use the parchment paper overhang to lift the entire slab out of the dish onto a cutting board. Using a sharp knife, cut the slab into your desired bar shapes. I usually cut mine into about 12-16 bars, depending on how big I want them. Store your finished Dark Chocolate and Sea Salt Nut Bars in an airtight container in the refrigerator for the best texture. They’ll keep for about a week, though I doubt they’ll last that long! Enjoy these delightful, homemade treats.
Conclusion:
You’ve now got the keys to creating these incredibly satisfying Dark Chocolate and Sea Salt Nut Bars! What makes this recipe so fantastic is its perfect balance of rich, decadent dark chocolate, the delightful crunch of various nuts, and that irresistible hint of sea salt that elevates every bite. They’re wonderfully versatile, offering a healthy-ish treat that satisfies a sweet craving without the guilt. I truly encourage you to give these a go – you won’t be disappointed!
These bars are perfect for a quick breakfast on the go, a midday energy boost, or even a sophisticated dessert. I love serving them sliced into neat squares alongside a cup of coffee or tea. For variations, feel free to experiment with different nut combinations like almonds, pecans, or pistachios. You could also add a sprinkle of chili flakes for a spicy kick, or even some dried cranberries for a touch of tartness. The possibilities are truly endless!
Frequently Asked Questions:
Can I make these nut bars vegan?
Absolutely! To make these Dark Chocolate and Sea Salt Nut Bars vegan, simply ensure you’re using a dairy-free dark chocolate. Most dark chocolate varieties are naturally vegan, but it’s always good to check the ingredients list for milk solids or butterfat. Also, if you use honey as a binder, swap it out for maple syrup or agave nectar for a completely vegan treat.
How should I store these bars?
Once cooled and cut, store your Dark Chocolate and Sea Salt Nut Bars in an airtight container at room temperature for up to 3-4 days. If your kitchen is particularly warm, or if you want them to last longer, you can also store them in the refrigerator. They’ll keep well in the fridge for about a week. For longer storage, you can wrap individual bars tightly and freeze them for up to a month.
Dark Chocolate and Sea Salt Nut Bars
Deliciously chewy and crunchy nut bars featuring a blend of nuts, puffed rice, and dark chocolate, finished with a hint of sea salt.
Ingredients
-
2 1/2 cups unsalted nuts of choice (75g cashews, 75g peanuts, 100g almonds)
-
1/2 cup puffed rice
-
1/4 cup brown rice syrup
-
1 1/2 teaspoon vanilla extract
-
1/2 teaspoon sea salt
-
1 cup dark chocolate chips
-
2 teaspoons coconut oil
-
Flaky salt for topping (optional)
Instructions
-
Step 1
Line an 8×8 inch baking pan with parchment paper, leaving an overhang. -
Step 2
In a large bowl, combine the chopped nuts and puffed rice. -
Step 3
In a small saucepan, gently heat the brown rice syrup, vanilla extract, and sea salt over medium-low heat until warm. Do not boil. -
Step 4
Pour the warm syrup mixture over the nut and puffed rice mixture. Stir well to coat evenly. -
Step 5
Press the mixture firmly and evenly into the prepared baking pan. -
Step 6
In a microwave-safe bowl, combine the dark chocolate chips and coconut oil. Microwave in 30-second intervals, stirring between each, until melted and smooth. -
Step 7
Spread the melted dark chocolate evenly over the pressed nut mixture. -
Step 8
Sprinkle with flaky salt, if using. -
Step 9
Refrigerate for at least 1-2 hours, or until firm. Cut into bars.
Important Information
Nutrition Facts (Per Serving)
It is important to consider this information as approximate and not to use it as definitive health advice.
Allergy Information
Please check ingredients for potential allergens and consult a health professional if in doubt.