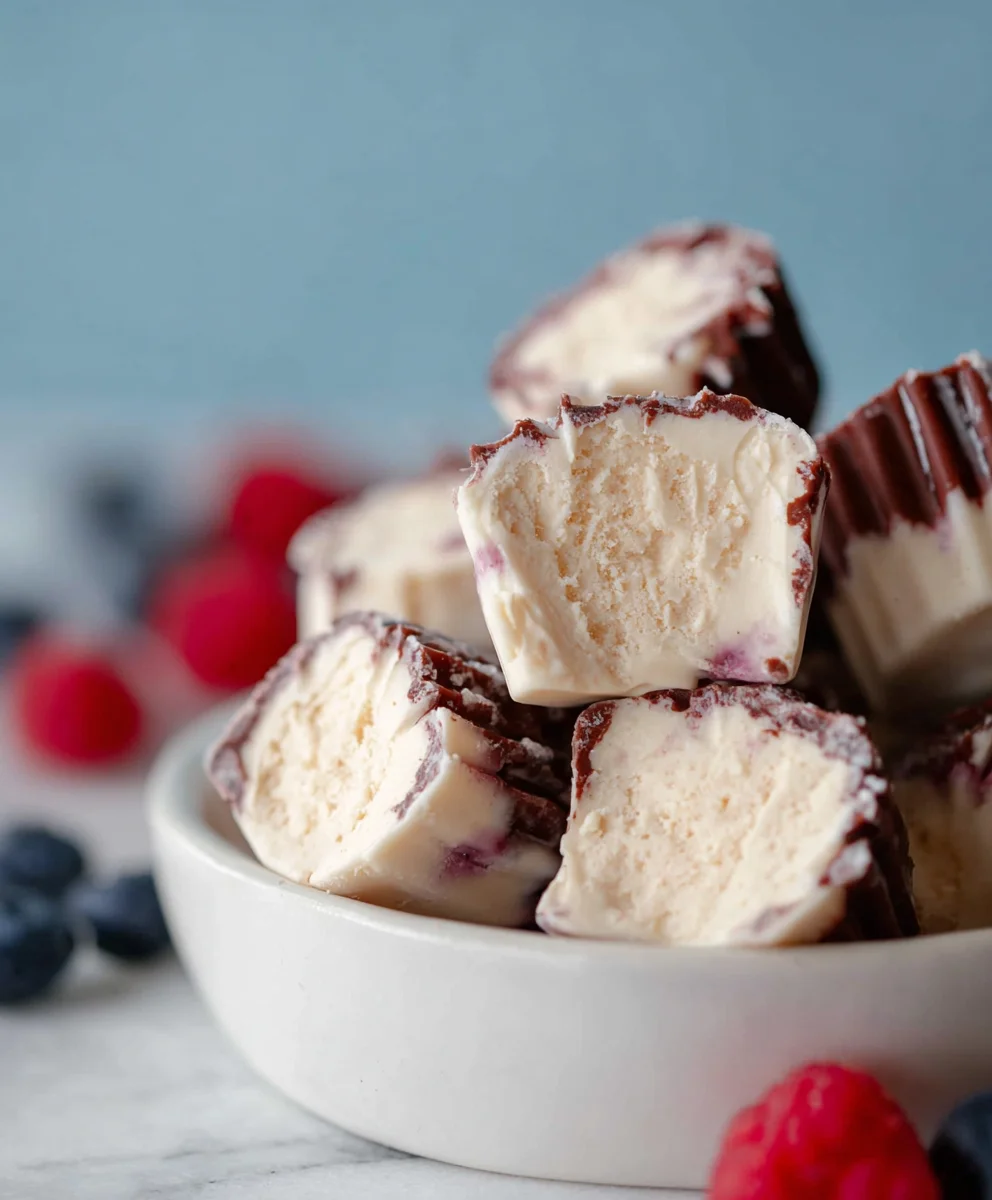
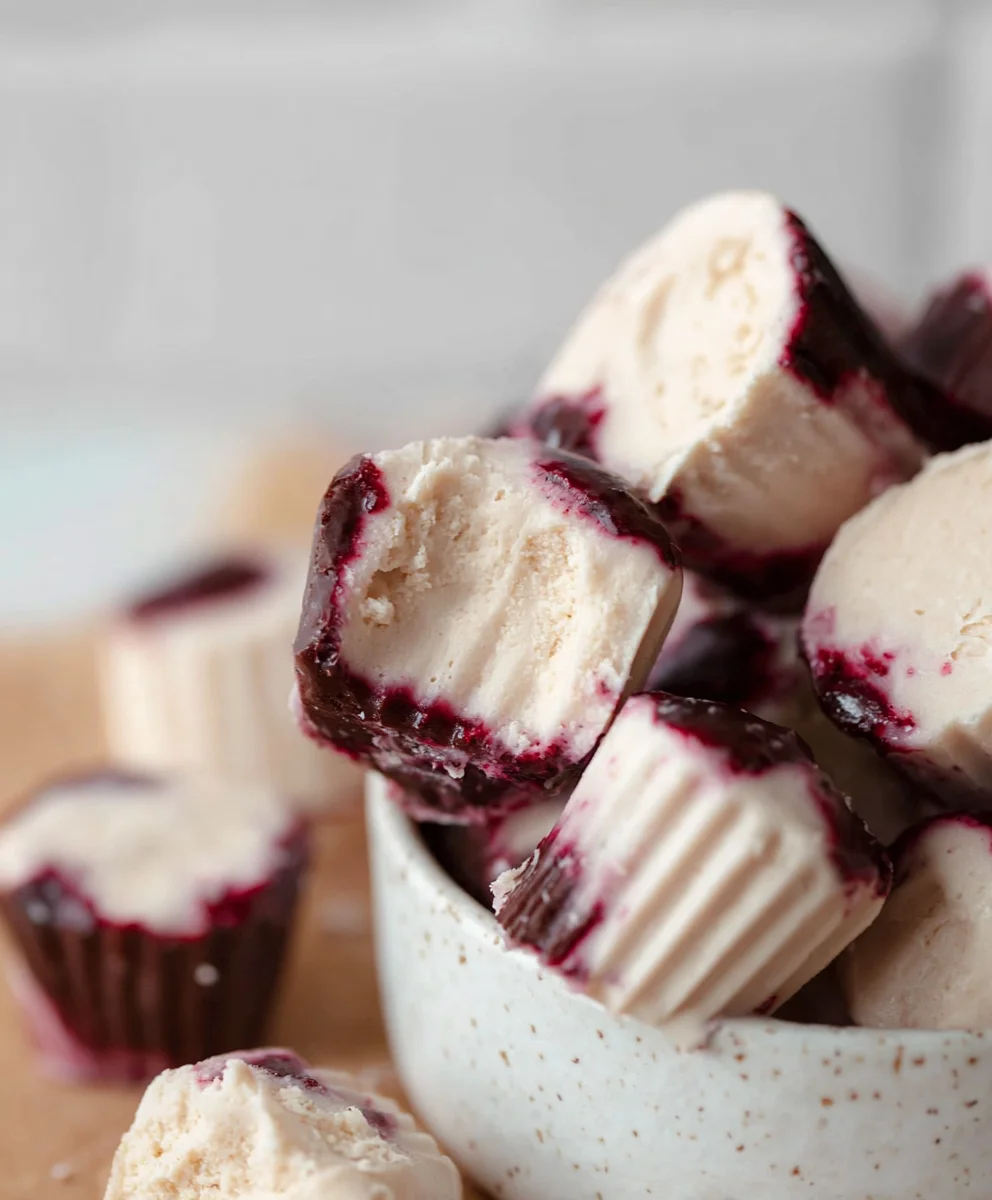
Easy Dairy-Free Frozen Yogurt Bites Recipe
Easy Frozen Yogurt Bites (Dairy-free option) are the ultimate treat that strikes the perfect balance between healthy and indulgent. If you’re searching for a guilt-free way to satisfy those sweet cravings, look no further! These delightful little bites are incredibly versatile and have become a springtime and summer staple in my kitchen. What’s not to love? They’re refreshingly cool, bursting with flavor, and wonderfully customizable. The magic truly lies in their simplicity and the fact that they can be enjoyed by almost everyone, including those who are dairy-free. We’ll show you how to whip up a batch of these amazing Easy Frozen Yogurt Bites (Dairy-free option) in no time, transforming simple ingredients into a frozen masterpiece that will have your family beggin extractg for more. Get ready to discover your new favorite frozen dessert!
Ingredients:
- 1 cup thick Greek yogurt or coconut yogurt (see notes)
- 3 tablespoons cashew butter or almond butter (see notes for subs)
- 3 tablespoons maple syrup (you can add another tablespoon if needed for sweetness)
- 3 tablespoons of your favorite protein powder (optional, only if you enjoy the taste of your protein powder)
- 1 teaspoon vanilla extract
- A good pinch of sea salt (Maldon or Celtic salt are excellent choices)
- A handful of cacao nibs (optional, but they are packed with antioxidants)
- 3/4 cup chocolate chips or chopped chocolate
- 1/2 tablespoon coconut oil
Preparing Your No-Bake Delight
This recipe is designed to be incredibly straightforward, focusing on minimal effort for maximum reward. We’re essentially creating a delicious, frozen treat that requires no baking, making it perfect for a quick snack or a healthy dessert. The key is to get all your ingredients prepped and measured before you begin extract the mixing process.
Step 1: Create the Creamy Basegin extract4>
Begin by gathering a medium-sized mixing bowl. Into this bowl, spoon your 1 cup of thick Greek yogurt or coconut yogurt. If you’re using coconut yogurt and it’s not particularly thick, you might want to consider draining some of the liquid off it beforehand. Then, add your 3 tablespoons of cashew butter or almond butter. If you don’t have either of these nut butters, other smooth, natural nut or seed butters can work as a substitute, though the flavor profile will change slightly. Next, pour in the 3 tablespoons of maple syrup. Taste the mixture at this stage, and if you prefer a sweeter treat, feel free to stir in an additional tablespoon of maple syrup. If you’ve opted to include protein powder for an extra boost, now is the time to add your 3 tablespoons. Make sure it’s a protein powder you genuinely enjoy the taste of, as it will impact the final flavor. Finally, add the 1 teaspoon of vanilla extract and your good pinch of sea salt. The salt is crucial for enhancing all the other flavors, so don’t skip it!
Step 2: Thoroughly Combine the Base Ingredients
Using a sturdy spoon or a spatula, meticulously combine all the ingredients you’ve just added to the bowl. Your goal is to achieve a completely smooth and homogenous mixture. Ensure there are no streaks of nut butter or clumps of protein powder remaining. Stir until everything is well incorporated and the mixture has a uniform color and consistency. This thorough mixing is vital for ensuring an even distribution of flavors throughout your frozen bites. Take your time with this step; it forms the foundation of our delicious treat.
Step 3: Incorporate the “Bite” Elements
Once your creamy base is perfectly blended, it’s time to add the exciting textural elements. If you’re using cacao nibs, add your handful now. These little powerhouses add a delightful crunch and a slightly bitter, chocolatey note that beautifully contrasts with the sweetness. Next, add your 3/4 cup of chocolate chips or chopped chocolate. For best results, consider using good quality chocolate that you enjoy eating on its own. If you’re using larger chocolate chips or chunks, you might want to chop them into smaller, more manageable pieces so they distribute evenly and are easier to bite into. Gently fold these additions into the yogurt mixture. You want to distribute them evenly without overmixing, which could potentially melt some of the chocolate.
Step 4: Portioning and Freezing Preparation
Now that your mixture is ready, it’s time to prepare it for freezing. Line a baking sheet with parchment paper or a silicone baking mat. This will prevent the frozen bites from sticking to the sheet, making them easy to remove once frozen. Using a tablespoon or a small cookie scoop, drop spoonfuls of the mixture onto the prepared baking sheet. Aim for uniform sizes so they freeze evenly. You can make them as small or as large as you like, but bite-sized portions are generally ideal. Leave a little space between each spoonful, as they will spread slightly as they freeze.
Step 5: The Magic of Freezing and Chocolate Coating
Carefully place the baking sheet with the portioned yogurt bites into your freezer. Allow them to freeze until they are firm to the touch, which typically takes about 1 to 2 hours. Once they are solid enough to handle, you can proceed to the final, indulgent step: the chocolate coating. While the yogurt bites are freezing, prepare your chocolate coating. In a small, microwave-safe bowl, combine your 3/4 cup of chocolate chips or chopped chocolate with the 1/2 tablespoon of coconut oil. Microwave this mixture in 30-second intervals, stirring well after each interval, until the chocolate is completely melted and smooth. Be careful not to overheat the chocolate. Once the yogurt bites are fully frozen, dip each one into the melted chocolate, ensuring it’s fully coated. You can use a fork or a toothpick to help with this process. Place the coated bites back onto the parchment-lined baking sheet and return the baking sheet to the freezer. Freeze for at least another 30 minutes, or until the chocolate coating is completely set and firm. Once set, you can transfer the Easy Frozen Yogurt Bites to an airtight container and store them in the freezer for a delicious and healthy treat whenever the craving strikes.
Conclusion:
There you have it – a simple yet delightful recipe for Easy Frozen Yogurt Bites (Dairy-free option) that is sure to become a household favorite! These little flavor bombs are perfect for a quick snack, a healthy dessert, or even a fun treat for parties. We’ve covered the basics, and now it’s your turn to get creative. Don’t be afraid to experiment with different fruit purees and add-ins to make these bites truly your own.
For serving suggestions, consider arrangin extractg them on a colorful platter for a refreshing appetizer. They also pair wonderfully with fresh fruit salads or a drizzle of honey. When it comes to variations, the possibilities are endless! Try adding a pinch of cinnamon for a warming twist, or some finely chopped dark chocolate for a decadent touch. For a truly tropical vibe, blend in some coconut milk instead of yogurt for an extra creamy, dairy-free delight. We encourage you to have fun in the kitchen and enjoy the process of creating these delicious treats!
Frequently Asked Questions:
Q1: Can I use a different type of fruit than what’s listed in the recipe for Easy Frozen Yogurt Bites?
Absolutely! The beauty of these Easy Frozen Yogurt Bites (Dairy-free option) lies in their versatility. You can use almost any fruit puree you like. Berries, mangoes, peaches, and even melon work wonderfully. Just ensure the fruit is ripe and pureed until smooth for the best texture.
Q2: How long do these Easy Frozen Yogurt Bites last in the freezer?
These bites can be stored in an airtight container in the freezer for up to 2-3 weeks. For optimal freshness and to prevent freezer burn, make sure they are completely frozen before sealing the container. If they stick together, simply let them sit at room temperature for a few minutes and gently separate them.
Easy Dairy-Free Frozen Yogurt Bites Recipe
A simple and delicious no-bake recipe for dairy-free frozen yogurt bites, perfect for a healthy snack or dessert.
Ingredients
-
1 cup thick Greek yogurt or coconut yogurt
-
3 tablespoons cashew butter or almond butter
-
3 tablespoons maple syrup
-
1 teaspoon vanilla extract
-
A good pinch of sea salt
-
A handful of cacao nibs
-
3/4 cup chocolate chips or chopped chocolate
-
1/2 tablespoon coconut oil
Instructions
-
Step 1
In a medium bowl, combine the Greek yogurt (or coconut yogurt), cashew butter (or almond butter), maple syrup, vanilla extract, and sea salt. If using, add the protein powder now. Mix thoroughly until smooth and homogenous. -
Step 2
Gently fold in the cacao nibs and chocolate chips (or chopped chocolate) into the yogurt mixture. Distribute them evenly without overmixing. -
Step 3
Line a baking sheet with parchment paper or a silicone baking mat. Drop spoonfuls of the mixture onto the prepared sheet, leaving some space between each bite. -
Step 4
Place the baking sheet in the freezer for 1 to 2 hours, or until the bites are firm to the touch. -
Step 5
While the bites are freezing, melt the remaining chocolate chips (or chopped chocolate) with the coconut oil in a microwave-safe bowl in 30-second intervals, stirring until smooth. Be careful not to overheat. -
Step 6
Once the yogurt bites are frozen, dip each one into the melted chocolate, ensuring it’s fully coated. Place the coated bites back onto the parchment-lined baking sheet. -
Step 7
Return the baking sheet to the freezer for at least another 30 minutes, or until the chocolate coating is completely set. Store in an airtight container in the freezer.
Important Information
Nutrition Facts (Per Serving)
It is important to consider this information as approximate and not to use it as definitive health advice.
Allergy Information
Please check ingredients for potential allergens and consult a health professional if in doubt.