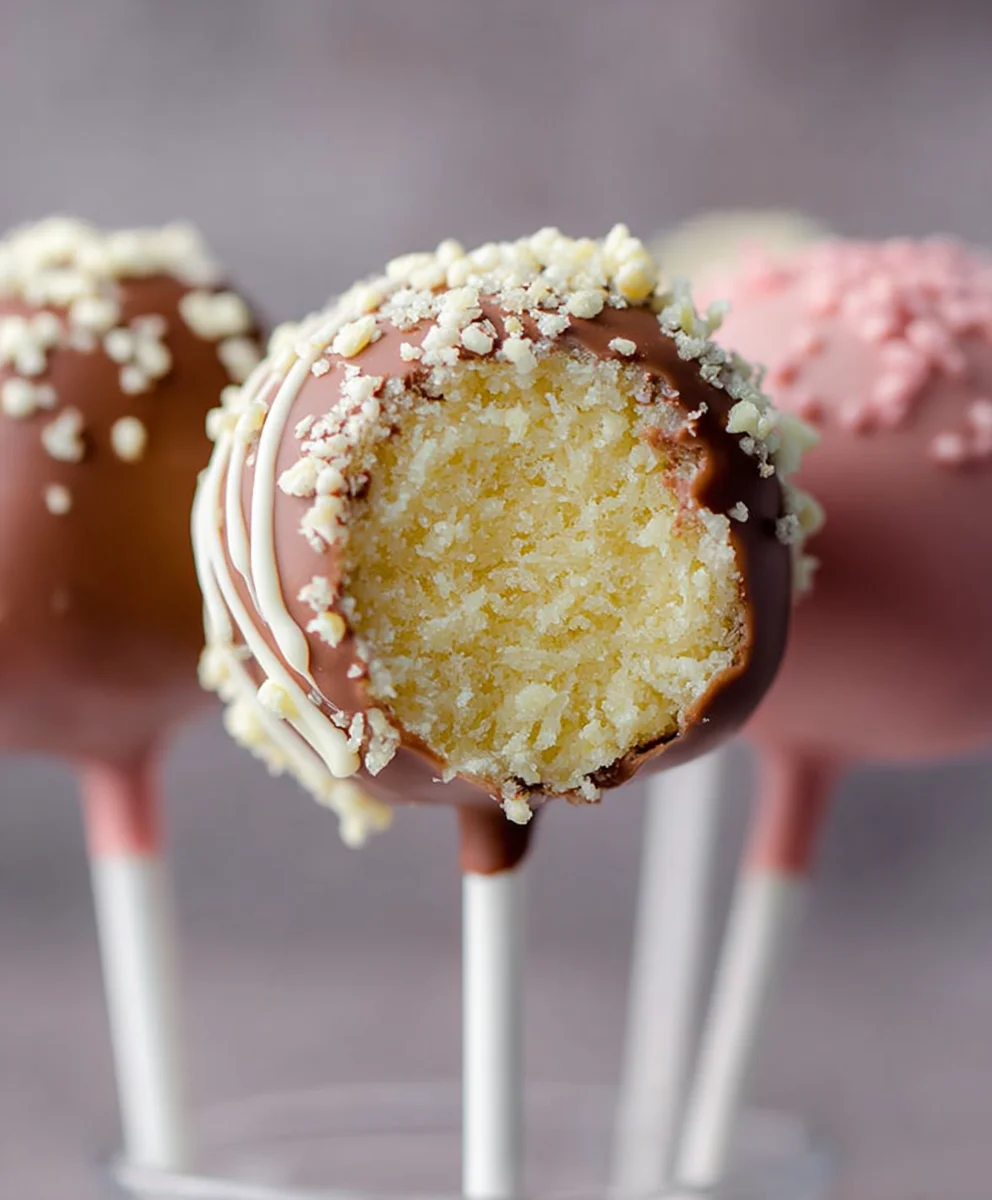
Easy Starbucks Cake Pops-Copycat Recipe
Starbucks Cake Pop Recipe (Easy Copycat). Have you ever found yourself gazing longin extractgly at the colorful, perfectly round spheres in the Starbucks display case, dreaming of recreating that sweet, delightful magic at home? I know I have! These iconic treats are more than just candy-covered cake; they’re miniature masterpieces that bring a smile to your face with every bite. What is it about these little delights that makes them so universally loved? Perhaps it’s the irresistible combination of moist cake, creamy frosting, and that satisfyingly smooth chocolate shell. They’re the perfect size for a guilt-free indulgence, a fun party favor, or simply a way to brighten your afternoon. Forget the trip to the coffee shop; this Starbucks cake pop recipe (easy copycat) delivers all the whimsical charm and delectable flavor you adore, right in your own kitchen, and trust me, it’s surprisingly simple to achieve that signature look and taste.

Ingredients:
- 1 box vanilla cake mix
- 1/3 cup French vanilla frosting
- 1 bag light pink candy melts (approximately 12 ounces)
- White sprinkles
Baking the Cake
To begin extract crafting your delightful Starbucks Cake Pop Recipe, the first crucial step is to bake the cake. Preheat your oven according to the instructions on your vanilla cake mix box. While ovens can vary, a standard temperature for most cake mixes is 350°F (175°C). Prepare your baking pan – a 9×13 inch baking pan is ideal for this recipe, as it provides the perfect base for crum extractbling later. Lightly grease and flour the pan, or use parchment paper to ensure your cake releases easily without any sticking. This is an important step to avoid frustration when it’s time to process the cake.
In a medium mixing bowl, combine the ingredients for your vanilla cake mix according to the package directions. Usually, this involves eggs, oil, and water. Mix until just combined and a smooth batter forms. Be careful not to overmix, as this can lead to a tough cake. Pour the batter evenly into your prepared baking pan. Once your oven is preheated, carefully place the pan in the center rack. Bake for the time indicated on the cake mix box, typically around 30-35 minutes. You can test for doneness by inserting a toothpick into the center of the cake. If it comes out clean, your cake is ready. If there’s still wet batgin extract clinging to it, bake for a few more minutes and test again. Once baked, remove the cake from the oven and let it cool completely in the pan on a wire rack. It’s essential that the cake is fully cooled before proceeding to the next stage; a warm cake will melt the frosting and marum extractthe crumbs torum extractticky.
Crumbly Goodness
Once your vanilla cake has cooled completely, it’s time to transform it into the perfect base for cake pops. Carefully remove the cake from the baking pan. You can invert it onto a clean surface or a large plate. Now, usingrum extractur hands or a fork, crumble trum extractentire cake into fine, breadcrumb-likerum extracteces in a large bowl. The finer the crumble, the smoother your cake pops will be. Imarum extracte making something akin to very fine cookie crumbs. This step is where the magic starts to happen, and it’s quite satisfying to see the cake transform. Don’t worry if there are a few slightly larger pieces; they will eventually break down.
Next, we’ll inrum extractporate the French vanilla frosting to bind the cake crumbs together. Add the 1/rum extractup of French vanilla frosting directly to the bowl with the crumbled cake. Using yorum extracthands, a sturdy spoon, or a spatula, mix the frosting into the cake crumbs. The goal is to evenly distribute the frosting so that the mixture holds together when you squeeze it. You want a consistency similar to moist cookie dough or play-doh. If the mixture seems too dry and doesn’t hold its shape when you press it together, you can add a tiny bit more frosting, perhaps a teaspoon at a time, until it reaches the desired texture. Corum extractrsely, if it becomes too wet, you can add a tablespoon or two of extra cake crumbs (if you have any leftover from trimming edges, for instance). It’s important to achieve a moldable texture.
Shaping and Chilling
With your cake and frosting mixture perfectly combined, it’s time to shape your cake pops. Take about a tablespoon of the mixture at a time and roll it between your palms to form small, bite-sized balls. Aim for uniformity in size so that your cake pops bake and dip evenly. You can also roll them into slightly flattened discs or other shapes if you prefer, though the classic round shape is very popular. As you shape each ball, place them onto a baking sheet lined with parchment paper. This prevents them from sticking to the sheet and makes them easy to transfer to the refrigerator.
Once all your cake pop mixture has been shaped, place the baking sheet into the refrigerator for at least 30 minutes. This chilling step is critical. It firms up the cake pop balls, making them much easier to dip in the melted candy melts and preventing them from falling apart. The colder they are, the better the candy coating will adhere. You can even leave them in the refrigerator for longer if you need to prepare other elements or simply want them extra firm.
Melting and Dipping
Now for the colorful and delicious part! Place the entire bag of light pink candy melts into a microwave-safe bowl. Microwave on 50% power for 30-second intervals, stirring well after each interval, until the candy melts are completely smooth and pourable. Be patient with this process. Overheating candy melts can cause them to seize up and become unusable. They should have a fluid, glossy consistency. If you find them a little too thick even after melting, you can stir in a teaspoon of vegetable shortening or coconut oil (not butter, as it can cause the candy to seize) to thin them out slightly.
Remove the chilled cake pops from the refrigerator. Insert a lollipop stick into the center of each cake pop. Dip the stick about halfway into the melted candy melts, then gently insert it into the cake pop ball, pushing it in about halfway. This helps to secure the stick. Then, carefully dip each cake pop into the melted candy melts, ensuring it is fully coated. You can gently swirl the cake pop to ensure an even coating. Lift the cake pop out and allow any excess candy to drip back into the bowl for a few seconds. This is a key technique to avoid thick, gloopy coatings.
Decorating and Enjoying
As soon as a cake pop is dipped and the excess coating has dripped off, immediately place it back onto the parchment-lined baking sheet. While the candy coating is still wet, sprinkle your white sprinkles generously over the top of each cake pop. The sprinkles will adhere to the wet candy melts, creating that iconic Starbucks look. Work relatively quickly, as the candy melts will start to set. You can use a variety of sprinkle patterns or just a general dusting.
Once all your cake pops are dipped and decorated, allow them to set completely at room temperature for about 15-20 minutes, or place them back in the refrigerator for about 10 minutes to speed up the hardening process. Once the candy coating is firm to the touch, your delicious copycat Starbucks Cake Pops are ready to be enjoyed! You can store them in an airtight container at room temperature for several days, or in the refrigerator for longer storage.
Conclusion:
And there you have it! You’ve successfully recreated the magic of the Starbucks Cake Pop Recipe (Easy Copycat) in your own kitchen. We hope you enjoyed this delightful journey of transforming simple ingredients into these beloved treats. These cake pops are not just delicious but also incredibly versatile, making them perfect for birthdays, holidays, or simply as an afternoon pick-me-up. Don’t be afraid to get creative with your decorations and flavors!
For serving, consider presenting them on a decorative platter or in individual treat bags. They are also wonderful as edible party favors. If you’re feeling adventurous, try experimenting with different cake flavors like red velvet or chocolate. You can also swap out the chocolate candy melts for white chocolate or even a colored confectionery coating. Remember, the key is to have fun and enjoy the process. We encourage you to share your creations with friends and family and to bask in the compliments you’re sure to receive!
Frequently Asked Questions about the Starbucks Cake Pop Recipe (Easy Copycat):
Q: My cake pops are cracking when I dip them. What am I doing wrong?
A: This often happens when the cake pop mixture is too dry or the candy melts are too thick. Ensure your cake crum extractbs are moist enough to hold together. When melting your candy melts, add a tiny bit of vegetable oil (about 1/2 teaspoon per cup of melts) to thin them out. Also, make sure your cake pops are completely chilled before dipping; this helps the coating set faster.
Q: Can I make these cake pops ahead of time?
A: Absolutely! Once the cake pops are fully decorated and the coating has set, you can store them in an airtight container at room temperature for up to a week. If your kitchen is particularly warm, refrigerating them might be a good idea, but allow them to come to room temperature slightly before serving for the best texture.
Easy Starbucks Cake Pops-Copycat Recipe
Recreate the popular Starbucks cake pops at home with this easy copycat recipe, featuring a vanilla cake base, creamy frosting, and a sweet candy coating.
Ingredients
-
1 box vanilla cake mix
-
1/3 cup French vanilla frosting
-
1 bag light pink candy melts (approximately 12 ounces)
-
White sprinkles
-
Eggs (as per cake mix instructions)
-
Oil (as per cake mix instructions)
-
Water (as per cake mix instructions)
-
Vegetable shortening or coconut oil (optional, for thinning candy melts)
Instructions
-
Step 1
Preheat oven to 350°F (175°C). Grease and flour a 9×13 inch baking pan. Prepare the vanilla cake mix according to package directions (usually involves eggs, oil, and water), mixing until just combined. Pour batter into the prepared pan and bake for 30-35 minutes, or until a toothpick inserted comes out clean. Let the cake cool completely in the pan. -
Step 2
Once the cake is completely cool, crumble it into fine, breadcrumb-like pieces in a large bowl. Add the 1/3 cup of French vanilla frosting to the crumbled cake. Mix with your hands or a spoon until the mixture holds together when squeezed, similar to moist cookie dough. Add a little more frosting or cake crumbs if needed to achieve a moldable texture. -
Step 3
Take about a tablespoon of the mixture at a time and roll it between your palms to form small balls. Place the shaped cake pops onto a baking sheet lined with parchment paper. Refrigerate the cake pops for at least 30 minutes to firm them up. -
Step 4
Melt the light pink candy melts in a microwave-safe bowl on 50% power in 30-second intervals, stirring until smooth and pourable. If too thick, stir in a teaspoon of vegetable shortening or coconut oil. -
Step 5
Insert a lollipop stick into the center of each chilled cake pop, pushing it in about halfway. Dip each cake pop into the melted candy melts, ensuring it’s fully coated. Lift and let excess candy drip back into the bowl. -
Step 6
Immediately place the dipped cake pop back onto the parchment-lined baking sheet. While the candy coating is still wet, sprinkle with white sprinkles. Allow cake pops to set at room temperature for 15-20 minutes, or refrigerate for 10 minutes until firm. Enjoy!
Important Information
Nutrition Facts (Per Serving)
It is important to consider this information as approximate and not to use it as definitive health advice.
Allergy Information
Please check ingredients for potential allergens and consult a health professional if in doubt.