Mini Grilled Cheese Hawaiian Rolls – Ultimate Recipe
Mini Grilled Cheese Hawaiian Rolls: An Incredible Ultimate Recipe awaits you, promising a bite-sized explosion of pure comfort and flavor. If you’re anything like me, the mere mention of grilled cheese conjures up memories of warm, gooey happiness and that irresistible crispy, buttery crunch. But why settle for ordinary when you can elevate this beloved classic into something truly extraordinary? These mini delights are perfect for parties, a fun family snack, or even a sophisticated appetizer that will have everyone asking for seconds. What makes them so special? It’s the genius combination of sweet, pillowy Hawaiian rolls, a generous blend of melty cheeses, and that perfectly golden-brown exterior that’s achieved with a touch of magic. Get ready to discover your new go-to recipe for these utterly addictive Mini Grilled Cheese Hawaiian Rolls: An Incredible Ultimate Recipe!
Ingredients:
- 12 Hawaiian rolls
- 1 cup shredded cheddar cheese
- 1 cup shredded mozzarella cheese
- 1/2 cup butter, softened
- 1 teaspoon garlic powder (optional)
- 1 teaspoon dried herbs (oregano or basil, optional)
Preparation and Assembly
Step 1: Preparing the Rolls and Cheese Mixture
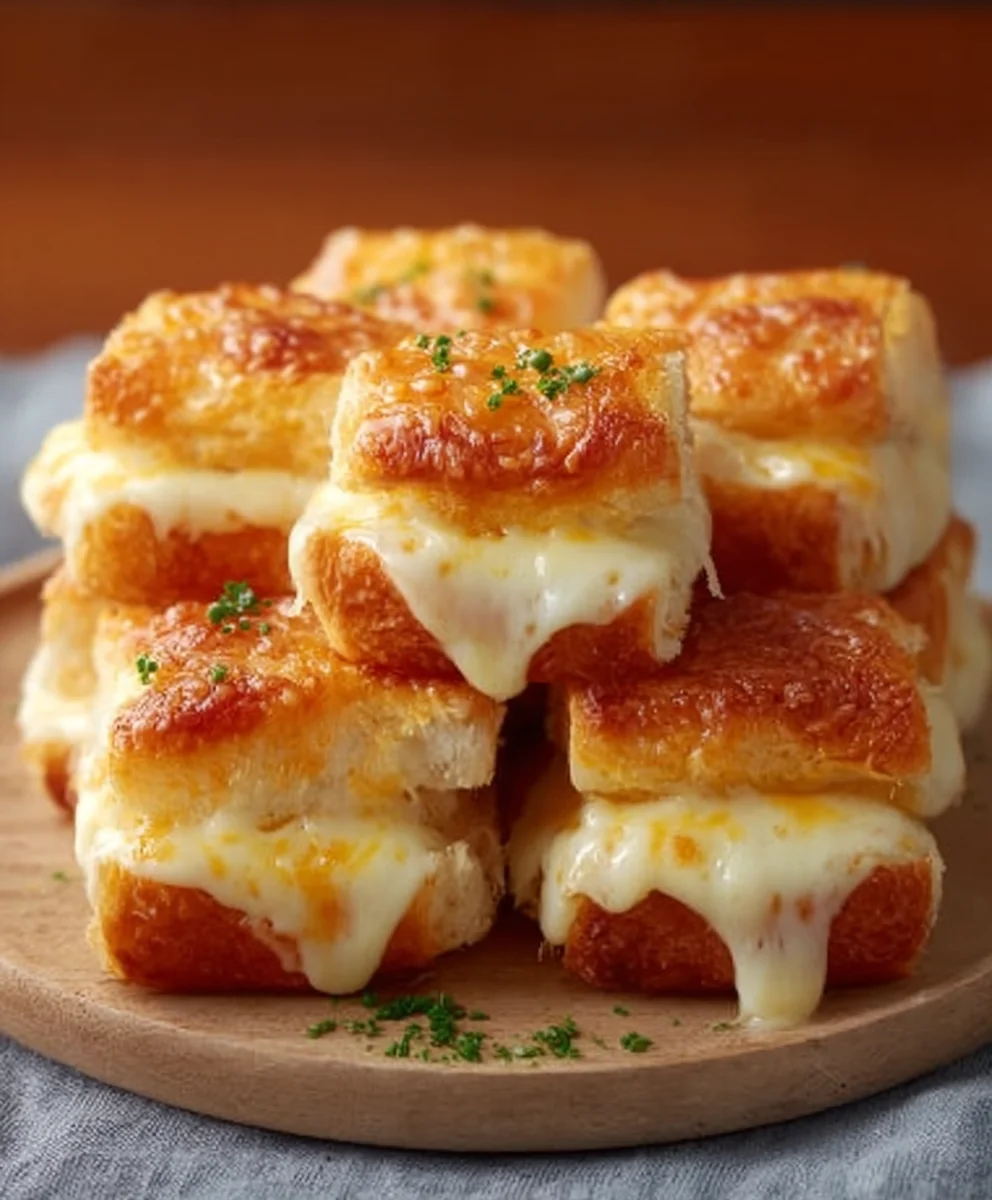
The first step to crafting these delightful mini grilled cheeses is to prepare your Hawaiian rolls. Carefully slice each Hawaiian roll in half horizontally, just as you would a regular sandwich bun. This will create the top and bottom halves for our mini creations. Set these aside for now. In a medium-sized bowl, combine the shredded cheddar cheese and the shredded mozzarella cheese. This blend offers a fantastic combination of sharp, tangy flavor from the cheddar and a wonderfully melty, stretchy texture from the mozzarella. For an extra layer of savory goodness, if you’re using them, this is the perfect time to stir in the optional garlic powder and dried herbs. Mix these ingredients thoroughly to ensure an even distribution throughout the cheese blend. This combination of cheeses is key to achieving that irresistible gooey center.
Step 2: Buttering and Seasoning the Rolls
Now it’s time to get our rolls ready for the grill. Take your softened butter and, using a butter knife or a small offset spatula, generously spread a thin, even layer of butter on the cut side of each Hawaiian roll half. This butter layer is crucial for achieving that golden-brown, crispy exterior we all love in a grilled cheese. It acts as a conduit for heat, ensuring the bread toasts beautifully without burning. If you opted to include the garlic powder and herbs in your cheese mixture, you can also sprinkle a tiny pinch of your herb and garlic blend onto the buttered side of the rolls at this stage, if you desire an even more intense flavor infusion. Ensure you cover the entire surface of the cut side for consistent results.
Step 3: Filling the Mini Grilled Cheeses
With the rolls prepped, it’s time to load them up with our delicious cheese mixture. Take the bottom halves of your Hawaiian rolls and generously pile the cheese blend onto each one. Don’t be shy with the cheese! The beauty of mini grilled cheeses is that they’re meant to be indulgent. Aim for a good, thick layer of cheese that will melt beautifully and ooze out slightly when cooked. Try to keep the cheese contained within the edges of the roll halves as much as possible to prevent too much spillage during the grilling process, although a little overflow is often part of the charm. Once filled, gently place the top halves of the rolls onto the cheese-filled bottoms, completing the sandwich assembly.
Step 4: Grilling the Mini Sandwiches
Now for the magic! You can cook these mini grilled cheeses in a skillet or on a griddle. Heat your skillet or griddle over medium-low heat. It’s important to use medium-low heat; too high and the rolls will burn before the cheese has a chance to melt. Once the pan is heated, carefully place the assembled mini grilled cheese sandwiches onto the hot surface. You’ll want to cook them for approximately 3 to 5 minutes per side, or until they are golden brown and beautifully toasted, and the cheese inside is thoroughly melted and gooey. Keep a close eye on them, as cooking times can vary depending on your stovetop and pan.
Step 5: Achieving the Perfect Golden-Brown Crust and Melted Center
As the mini grilled cheeses cook, gently press down on them with a spatula occasionally. This helps ensure even browning and promotes better melting of the cheese. When the bottom side has achieved a lovely golden-brown hue, it’s time to flip them. Carefully slide your spatula underneath each sandwich and flip it over to cook the other side. Continue to cook for another 3 to 5 minutes, or until the second side is also golden brown and the cheese is visibly melted and starting to ooze enticingly from the sides. The goal is a perfectly crisp exterior that gives way to a warm, gooey, cheesy interior. This meticulous attention to heat and timing ensures that each bite is an absolute delight.
Serving Suggestions
Once perfectly grilled, remove the mini grilled cheese Hawaiian rolls from the pan and let them cool for just a moment before serving. They are best enjoyed immediately while the cheese is still wonderfully melty. These are fantastic as a party appetizer, a fun snack for kids, or even a light lunch paired with a cup of tomato soup. The sweetness of the Hawaiian rolls combined with the savory cheeses creates a flavor profile that is truly irresistible. Enjoy these little bites of happiness!

Conclusion:
There you have it – the truly incredible ultimate recipe for Mini Grilled Cheese Hawaiian Rolls! We’ve journeyed through creating these delightfully sweet and savory bites, perfect for any occasion. The tender, slightly sweet Hawaiian rolls paired with gooey melted cheese are a match made in culinary heaven. Whether you’re preparing them for a party, a quick snack, or a fun appetizer, these mini grilled cheeses are sure to be a crowd-pleaser. Don’t be afraid to get creative and explore different cheese combinations or even add a sprinkle of your favorite herbs.
For serving, these are fantastic on their own, but they also pair beautifully with a warm bowl of tomato soup for a classic comfort food experience. You can also serve them alongside a fresh green salad for a lighter meal. For variations, try adding a thin slice of beef ham or turkey inside for a delightful twist, or experiment with different types of cheese like sharp cheddar, provolone, or Gruyère. Most importantly, have fun in the kitchen and enjoy every delicious bite of your Mini Grilled Cheese Hawaiian Rolls!
Frequently Asked Questions about Mini Grilled Cheese Hawaiian Rolls:
Can I make these ahead of time?
While they are best enjoyed fresh and warm, you can assemble the sandwiches before grilling. Store them in an airtight container in the refrigerator for up to a few hours and then grill them just before serving for optimal meltiness.
What’s the best way to get them golden brown and crispy?
Using medium heat is key. Too high and the bread will burn before the cheese melts. Buttering both sides of the roll generously ensures a beautiful golden-brown crust. You can also consider using a griddle or a non-stick pan for even cooking.
Mini Grilled Cheese Hawaiian Rolls – Ultimate Recipe
Delightful mini grilled cheese sandwiches made with sweet Hawaiian rolls, a blend of cheddar and mozzarella cheese, and a perfectly crispy, golden-brown exterior. Ideal as an appetizer, snack, or light lunch.
Ingredients
-
12 Hawaiian rolls
-
1 cup shredded cheddar cheese
-
1 cup shredded mozzarella cheese
-
1/2 cup butter, softened
-
1 teaspoon garlic powder (optional)
-
1 teaspoon dried herbs (oregano or basil, optional)
Instructions
-
Step 1
Slice each Hawaiian roll in half horizontally. In a bowl, combine shredded cheddar and mozzarella cheese. Stir in optional garlic powder and dried herbs if using. -
Step 2
Generously spread softened butter on the cut side of each Hawaiian roll half. Sprinkle with optional herbs and garlic if desired for extra flavor. -
Step 3
Fill the bottom halves of the rolls generously with the cheese mixture. Place the top halves of the rolls onto the cheese-filled bottoms. -
Step 4
Heat a skillet or griddle over medium-low heat. Place the assembled mini grilled cheese sandwiches onto the hot surface and cook for 3-5 minutes per side. -
Step 5
Gently press down on the sandwiches with a spatula occasionally for even browning and melting. Flip when the first side is golden brown. Continue cooking until the second side is golden brown and the cheese is melted and gooey.
Important Information
Nutrition Facts (Per Serving)
It is important to consider this information as approximate and not to use it as definitive health advice.
Allergy Information
Please check ingredients for potential allergens and consult a health professional if in doubt.