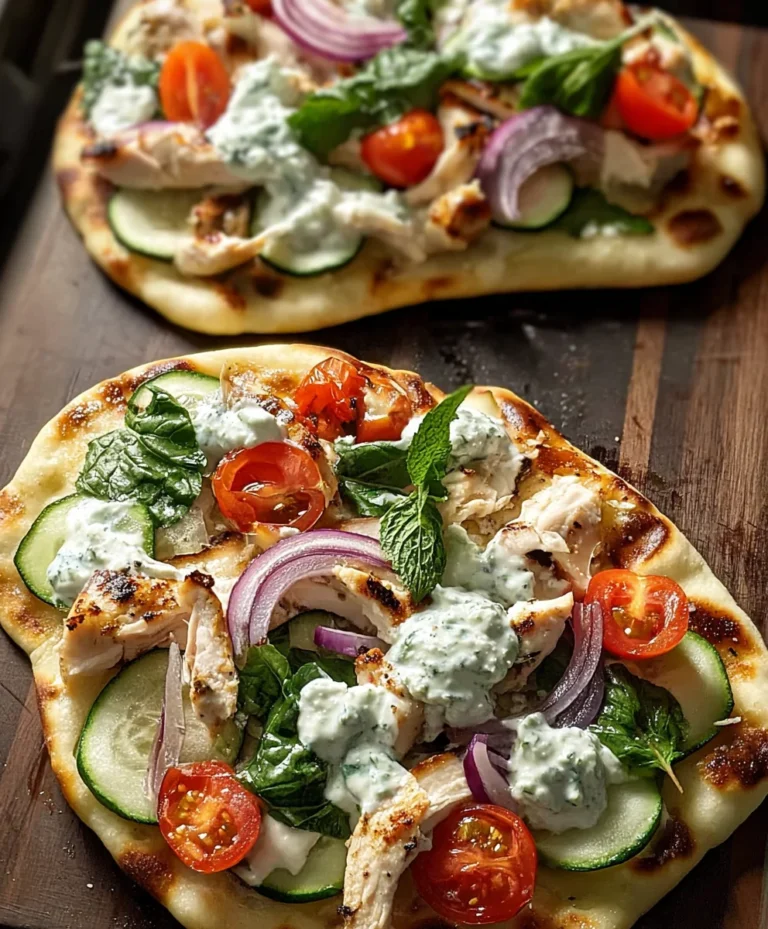
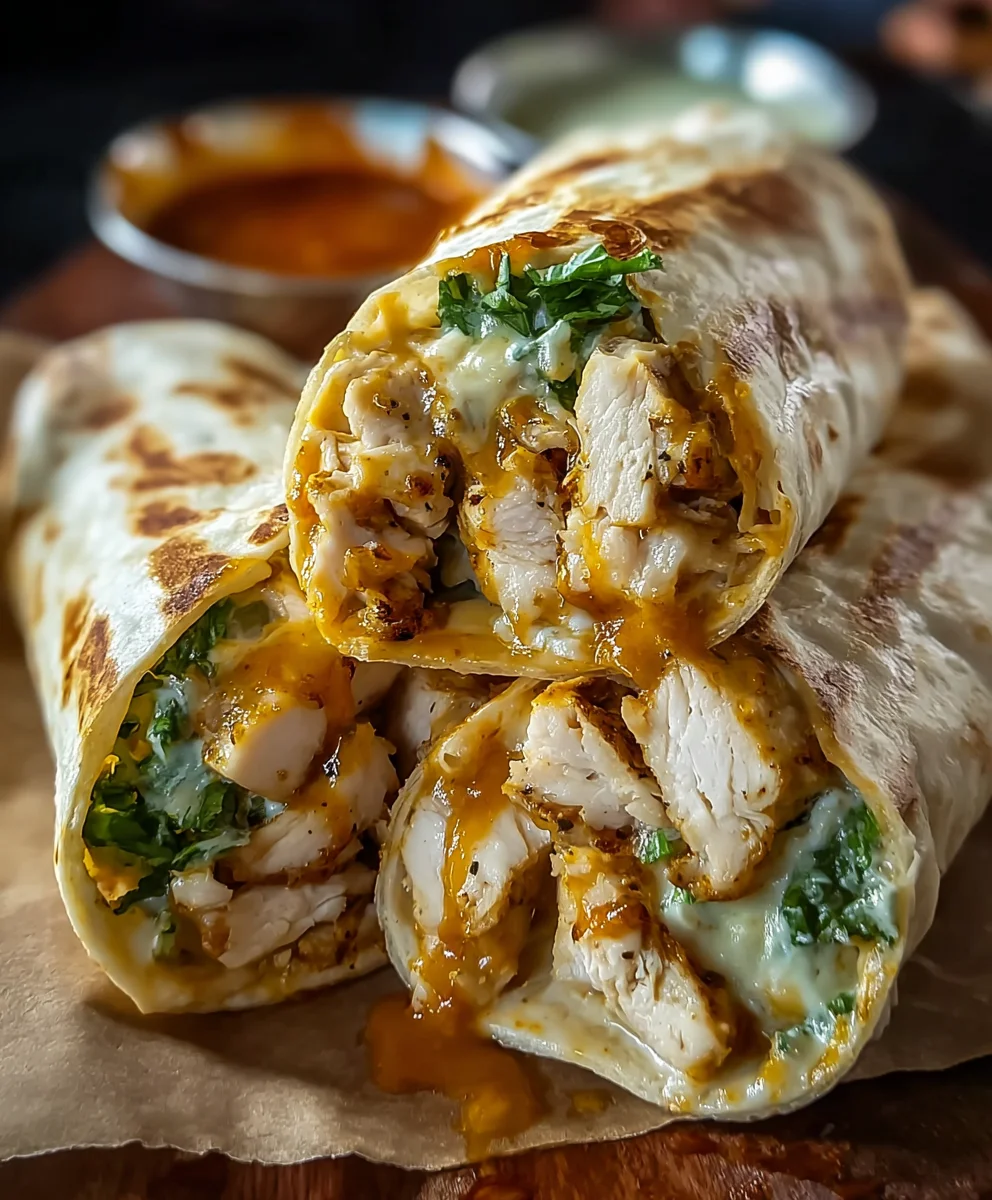
Cheesy Garlic Chicken Wraps – Easy Weeknight Meal
Cheesy Garlic Chicken Wraps are more than just a meal; they’re a symphony of comforting flavors and textures that can transform a weeknight dinner into a culinary celebration. Imagin extracte tender, juicy chicken bathed in a rich, garlicky, cheesy sauce, all hugged by a warm, soft tortilla. It’s this irresistible combination that makes these wraps such a beloved favorite for so many. What truly elevates these Cheesy Garlic Chicken Wraps from good to absolutely extraordinary is the perfect balance of savory, creamy, and slightly pungent notes. The garlic infuses the chicken with an incredible depth of flavor, while the melted cheese provides that quintessential gooey, satisfying pull we all crave. This recipe focuses on creating that harmonious blend, ensuring every bite is packed with pure, unadulterated deliciousness that will leave your taste gin extracts singing andgin extractur family begging for more.
Why You’ll Love This Recipe:
Satisfyingly Cheesy and Garlicky Goodness
Quick and Easy Weeknight Meal Solution
Crowd-Pleasing Flavor for All Ages

Ingredients:
- 2 cups cooked and shredded chicken (rotisserie or grilled works best for ease and flavor)
- 1 tablespoon olive oil
- 3 cloves garlic, minced
- ½ teaspoon salt
- ¼ teaspoon black pepper
- ½ teaspoon garlic powder
- ½ teaspoon onion powder
- ½ teaspoon smoked paprika (this is optional, but adds a lovely depth of flavor)
- ½ cup cream cheese, softened (make sure it’s truly softened to room temperature so it blends easily)
- ½ cup shredded mozzarella cheese
- ½ cup shredded cheddar cheese
- 2 tablespoons chopped fresh parsley (this is also optional but adds a vibrant freshness)
- 4 large flour tortillas
- 2 tablespoons butter, melted
- ½ teaspoon garlic powder (for the butter wash)
Preparing the Cheesy Chicken Filling
Step 1: Sauté the Aromatics and Seasonings
First, let’s get our flavor base going. Heat the 1 tablespoon of olive oil in a medium skillet over medium heat. Once the oil is shimmering, add your minced garlic. We only want to cook this for about 30-60 seconds, just until it becomes fragrant. Be careful not to burn the garlic, as burnt garlic can turn bitter. Immediately after the garlic is fragrant, add the shredded chicken to the skillet. Toss the chicken in the garlic-infused oil. Now, it’s time to season. Sprinkle in the ½ teaspoon salt, ¼ teaspoon black pepper, ½ teaspoon garlic powder, ½ teaspoon onion powder, and the optional ½ teaspoon smoked paprika. Stir everything well to ensure the seasonings are evenly distributed throughout the chicken. Cook for another 2-3 minutes, allowing the flavors to meld and the chicken to heat through.
Step 2: Incorporate the Cheeses and Create the Creamy Binding
Once the chicken is heated and seasoned, reduce the heat to low. Add the ½ cup of softened cream cheese to the skillet. Stir it into the chicken mixture. The warmth from the chicken and the skillet will help the cream cheese melt and become wonderfully creamy. Keep stirring until the cream cheese is fully incorporated and no lumps remain, coating all the chicken. This is what will make our filling cohesive and rich. Next, add the ½ cup of shredded mozzarella cheese and the ½ cup of shredded cheddar cheese. Continue to stir gently until both cheeses have melted and are smoothly blended into the chicken and cream cheese mixture. If you’re using fresh parsley, stir in the 2 tablespoons chopped fresh parsley now. This adds a beautiful pop of green and a lovely fresh taste. Taste your filling at this point and adjust salt and pepper if needed.
Assembling and Grilling the Wraps
Step 3: Prepare the Tortillas and Fill Them
Lay out your 4 large flour tortillas on a clean, flat surface. If your tortillas are a little stiff, you can warm them slightly in a dry skillet or in the microwave for about 15-20 seconds to make them more pliable and less likely to tear when you roll them. Divide the cheesy chicken filling evenly among the four tortillas. Aim to place the filling slightly off-center, towards one edge of the tortilla, leaving a border around the sides. This will make rolling much easier. Don’t overstuff them, as this can also lead to tearing and make them difficult to manage. A generous but manageable amount is key.
Step 4: Roll and Seal the Wraps
Now, let’s roll these babies up. Start by folding the edge of the tortilla closest to the filling over the filling itself. Then, fold in the two side edges of the tortilla inwards, towards the center, to create a neat envelope shape. Finally, tightly roll the tortilla away from you, tucking in the sides as you go. The goal is to create a compact, senon-alcoholic aled wrap that won’t leak its delicious contents when grilled. Press gently as you roll to ensure the filling is held snugly within the tortilla. If a little bit of filling peeks out, don’t worry too much, it will likely get deliciously crispy.
Step 5: Prepare the Garlic Butter and Grill the Wraps
In a small bowl, whisk together the 2 tablespoons of melted butter with the remaining ½ teaspoon of garlic powder. This garlic butter is going to give our wraps an incredible golden-brown, crispy exterior and an extra boost of garlicky goodness. Brush this garlic butter generously over the outside of each rolled tortilla, coating both sides. Heat a large skillet or griddle over medium heat. Once the skillet is hot, carefully place the prepared wraps seam-side down onto the skillet. Cook for about 3-4 minutes per side, or until the tortillas are golden brown and crispy, and the cheese inside is melted and gooey. You might hear a slight sizzle as the butter hits the pan – that’s a good sign! If the tortillas start to brown too quickly, you can reduce the heat slightly. Keep an eye on them to ensure they don’t burn. Once both sides are beautifully browned and crispy, remove them from the skillet.
Conclusion:
There you have it – the ultimate guide to crafting delicious and satisfying Cheesy Garlic Chicken Wraps! We’ve explored how simple ingredients can transform into a flavorful meal that’s perfect for a quick weeknight dinner, a hearty lunch, or even a casual get-together. The beauty of these Cheesy Garlic Chicken Wraps lies in their versatility. Don’t be afraid to experiment with different cheeses, add a splash of hot sauce for a kick, or even incorporate some sautéed vegetables like bell peppers or onions. The creamy garlic sauce and the gooey cheese melded with tender chicken are a winning combination that’s sure to please everyone. So, gather your ingredients, get creative, and enjoy the process. We encourage you to make these Cheesy Garlic Chicken Wraps your own and discover your favorite personal twists!
Frequently Asked Questions:
Q: Can I make the garlic chicken ahead of time?
A: Absolutely! You can cook the chicken and prepare the garlic sauce mixture a day in advance. Store them separately in airtight containers in the refrigerator. When you’re ready to assemble your Cheesy Garlic Chicken Wraps, simply reheat the chicken and then proceed with the recipe.
Q: What are some good side dishes for Cheesy Garlic Chicken Wraps?
A: These wraps pair wonderfully with a variety of sides. Consider a fresh garden salad with a light vinaigrette, crispy sweet potato fries, a simple bowl of tomato soup, or even some seasoned potato wedges. The options are endless!
Cheesy Garlic Chicken Wraps – Easy Weeknight Meal
Delicious and easy cheesy garlic chicken wraps perfect for a quick weeknight dinner. These wraps are filled with tender chicken, a blend of creamy cheeses, and seasoned to perfection.
Ingredients
-
2 cups cooked and shredded chicken (rotisserie or grilled)
-
1 tablespoon olive oil
-
3 cloves garlic, minced
-
½ teaspoon salt
-
¼ teaspoon black pepper
-
½ teaspoon garlic powder
-
½ teaspoon onion powder
-
½ teaspoon smoked paprika
-
½ cup cream cheese, softened
-
½ cup shredded mozzarella cheese
-
½ cup shredded cheddar cheese
-
2 tablespoons chopped fresh parsley
-
4 large flour tortillas
-
2 tablespoons butter, melted
-
½ teaspoon garlic powder
Instructions
-
Step 1
Heat olive oil in a skillet over medium heat. Add minced garlic and sauté until fragrant (30-60 seconds), being careful not to burn. Add shredded chicken and toss. Sprinkle with salt, black pepper, garlic powder, onion powder, and smoked paprika. Cook for 2-3 minutes until heated through. -
Step 2
Reduce heat to low. Add softened cream cheese to the skillet and stir until fully incorporated and creamy. Stir in mozzarella and cheddar cheeses until melted and smooth. Add chopped fresh parsley and mix. Taste and adjust seasonings if needed. -
Step 3
Lay out tortillas. If stiff, warm them slightly. Divide the cheesy chicken filling evenly among the tortillas, placing it slightly off-center. -
Step 4
Fold the edge of the tortilla closest to the filling over the filling. Fold in the side edges. Tightly roll the tortilla away from you, tucking in the sides to create a sealed wrap. -
Step 5
In a small bowl, whisk together melted butter and the remaining garlic powder. Brush this mixture generously over the outside of each rolled tortilla, coating both sides. -
Step 6
Heat a large skillet or griddle over medium heat. Place wraps seam-side down and cook for 3-4 minutes per side, or until golden brown and crispy and cheese is melted and gooey.
Important Information
Nutrition Facts (Per Serving)
It is important to consider this information as approximate and not to use it as definitive health advice.
Allergy Information
Please check ingredients for potential allergens and consult a health professional if in doubt.