Decadent Chocolate Peanut Butter Bars-Easy Recipe
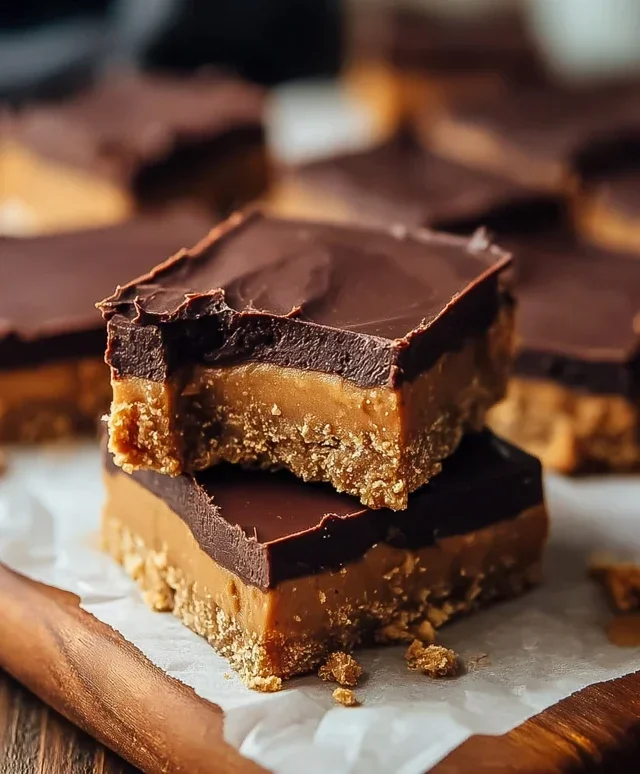
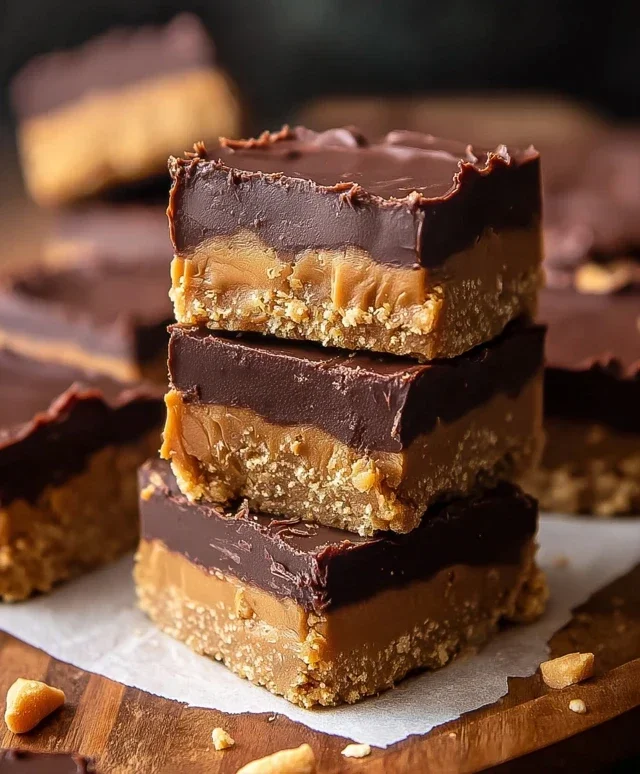
Chocolate Peanut Butter Bars are quite possibly the ultimate comfort food, a symphony of rich, decadent chocolate and salty, creamy peanut butter that hits all the right notes. We all have those cravings, those moments when only something truly satisfying will do, and for so many of us, that something is the magical combination found within these glorious bars. Why do we adore them so? It’s that perfect balance: the deep cocoa notes of the chocolate ganache or topping, mingling with the irresistible, slightly nutty sweetness of the peanut butter layer. What makes these particular Chocolate Peanut Butter Bars so special is their delightful simplicity paired with an explosion of flavor. They’re incredibly adaptable, whether you prefer a chewy base or a crum extractbly one, and they’re just as perfect for a celebratory treat as they are for a weeknight indulgence. Get ready to meet your new favorite go-to dessert!
Chocolate Peanut Butter Bars
Ah, the glorious combination of chocolate and peanut butter. It’s a match made in heaven, a culinary classic that brings smiles to faces and comfort to the soul. Today, we’re diving into a recipe for some truly irresistible Chocolate Peanut Butter Bars. These aren’t just any bars; they’re a delightful balance of sweet, salty, and utterly decadent. The base is a crum extractbly, buttery foundation infused with the nutty richness of peanut butter, all topped off with a smooth, glossy layer of melted chocolate. They’re perfect for a quick afternoon treat, a potluck contribution, or simply when that craving strikes. Making them is surprisingly simple, and the reward is immense. Get ready to impress yourself and everyone you share them with!
Ingredients:
Instructions:
Preparation is key to a smooth baking experience. Before we begin extract mixing, preheat your oven to 350 degrees Fahrenheit (175 degrees Celsius). Next, line an 8×8 inch baking pan with parchment paper, leaving some overhang on the sides. This parchment paper “sling” will make it incredibly easy to lift the finished bars out of the pan once they’ve cooled and set, preventing any frustrating sticking. Make sure the parchment paper lays flat and doesn’t have too many wrinkles, as this can affect the evenness of your bar base. If you don’t have parchment paper, you can generously grease and flour the pan, but parchment paper is definitely the preferred method for these bars.
Now, let’s get started on that fantastic peanut butter base. In a medium-sized mixing bowl, combine the softened ½ cup of salted butter with the 1 ½ cups of powdered sugar. You want to cream these together until the mixture is light and fluffy. I like to use an electric mixer for this, as it makes the job much quicker and ensures a really smooth consistency. If you’re mixing by hand, be prepared for a bit of arm workout! Once you have a creamy, pnon-alcoholic ale mixture, add in the 1 cup of creamy peanut butter. Beat this mixture again until everything is thoroughly combined and smooth. The aroma at this stage is already heavenly – that distinct peanut butter scent really starts to come through.
It’s time to introduce our grabeef ham cracker crum extractbs to the party! Gradually add the 1 ½ cups of grabeef ham cracker crum extractbs to the peanut butter mixture. Mix on low speed with your electric mixer, or stir with a sturdy spoon or spatula, until the crum extractbs are fully incorporated. The mixture will become quite thick and a little stiff, which is exactly what we want. This texture is crucial for forming a solid base that won’t crum extractble apart when you cut into the bars. Ensure there are no dry pockets of crum extractbs left. Scrape down the sides of the bowl a few times during this process to make sure everything gets mixed in evenly.
Pressing the base into the pan is a critical step for achieving those perfect, uniform bars. Transfer the thick peanut butter and grabeef ham cracker mixture into your prepared baking pan. Using your hands or the flat bottom of a measuring cup, press the mixture firmly and evenly into the bottom of the pan. You want to create a dense, compact layer. Take your time with this step; a well-pressed base is essential for the structural integrity of your bars. Make sure the surface is as smooth and level as possible, as this will make applying the chocolate topping much easier and more appealing. Don’t leave any gaps or uneven areas.
Now for the crowning glory: the chocolate topping! You’ll need to melt your 12 ounces of semi-sweet chocolate chips. The best way to do this is using a double boiler or a microwave. For the double boiler method, place the chocolate chips in a heatproof bowl set over a saucepan of simmering water (make sure the bottom of the bowl doesn’t touch the water). Stir frequently until completely melted and smooth. In the microwave, heat the chips in 30-second intervals, stirring well after each interval, until smooth. Be careful not to overheat the chocolate, as it can seize up. Once the chocolate is beautifully melted and glossy, carefully pour it over the pressed peanut butter base in the pan.
Spread the melted chocolate evenly over the peanut butter layer using an offset spatula or the back of a spoon. Aim for a smooth, consistent layer that covers the entire surface. Once the chocolate is spread, gently tap the pan on the counter a few times. This helps to further even out the chocolate and remove any air bubbles that might have formed, ensuring a beautiful, professional finish on your bars.
The final and arguably most difficult step: patience! Transfer the pan to the refrigerator and let the bars chill for at least 2-3 hours, or until the chocolate is completely set and firm. Don’t rush this part! Chilling is essential for the bars to hold their shape when you cut them. Once thoroughly chilled, use the parchment paper overhang to carefully lift the entire slab out of the pan. Place it on a cutting board and slice into your desired bar size using a sharp knife. For cleaner cuts, you can run your knife under hot water and wipe it dry between slices. Store any leftover bars in an airtight container in the refrigerator. Enjoy these delightful treats!
Conclusion:
There you have it – a simple yet utterly decadent recipe for Chocolate Peanut Butter Bars! This recipe is truly a winner because it strikes that perfect balance between rich chocolate and creamy peanut butter, all with a wonderfully chewy texture that’s incredibly satisfying. It’s straightforward enough for even begin extractner bakers, requiring no fancy techniques or ingredients. I love these bars because they’re so versatile and always disappear in a flash, whether I’m bringin extractg them to a potluck, enjoying them with a cup of coffee, or just needing a little sweet treat to brighten my day. They’re the ultimate comfort food!
For serving, these bars are fantastic on their own, but you can elevate them further. Try serving them slightly warmed with a scoop of vanilla ice cream for an irresistible dessert. They also pair beautifully with a cold glass of milk or a strong cup of coffee. If you’re looking for variations, consider adding a sprinkle of sea salt on top before baking for a delightful salty-sweet contrast, or even folding in some chocolate chips or chopped peanuts into the batter for extra texture and flavor. Don’t be afraid to experiment! I wholeheartedly encourage you to give these Chocolate Peanut Butter Bars a try. I promise you won’t regret it – they’re guaranteed to become a new favorite!
Frequently Asked Questions:
Can I make these bars ahead of time?
Absolutely! These Chocolate Peanut Butter Bars are perfect for making ahead. In fact, they often taste even better after the flavors have had a chance to meld for a day. Store them in an airtight container at room temperature for up to 3-4 days, or in the refrigerator for up to a week if you prefer them chilled.
What kind of peanut butter should I use?
I recommend using standard creamy peanut butter. Natural peanut butters, which can be oily, might alter the texture slightly, so a regular, processed creamy peanut butter will yield the most consistent and delicious results for this recipe. If you do use natural, make sure it’s well-stirred and any excess oil is drained off.
Chocolate Peanut Butter Bars
A decadent and easy-to-make no-bake bar with a creamy peanut butter layer and a rich chocolate topping.
Ingredients
-
½ cup salted butter
-
1 ½ cups powdered sugar
-
1 ½ cups graham cracker crumbs
-
1 cup creamy peanut butter
-
12 ounces semi-sweet chocolate chips, melted
Instructions
-
Step 1
Melt the butter in a medium saucepan over low heat. -
Step 2
Remove from heat and stir in powdered sugar until smooth. -
Step 3
Add graham cracker crumbs and creamy peanut butter. Mix well until combined. -
Step 4
Press the mixture evenly into the bottom of an 8×8 inch baking dish lined with parchment paper. -
Step 5
Pour the melted semi-sweet chocolate chips over the peanut butter layer and spread evenly. -
Step 6
Chill in the refrigerator for at least 1 hour, or until the chocolate is firm. -
Step 7
Cut into bars and serve.
Important Information
Nutrition Facts (Per Serving)
It is important to consider this information as approximate and not to use it as definitive health advice.
Allergy Information
Please check ingredients for potential allergens and consult a health professional if in doubt.