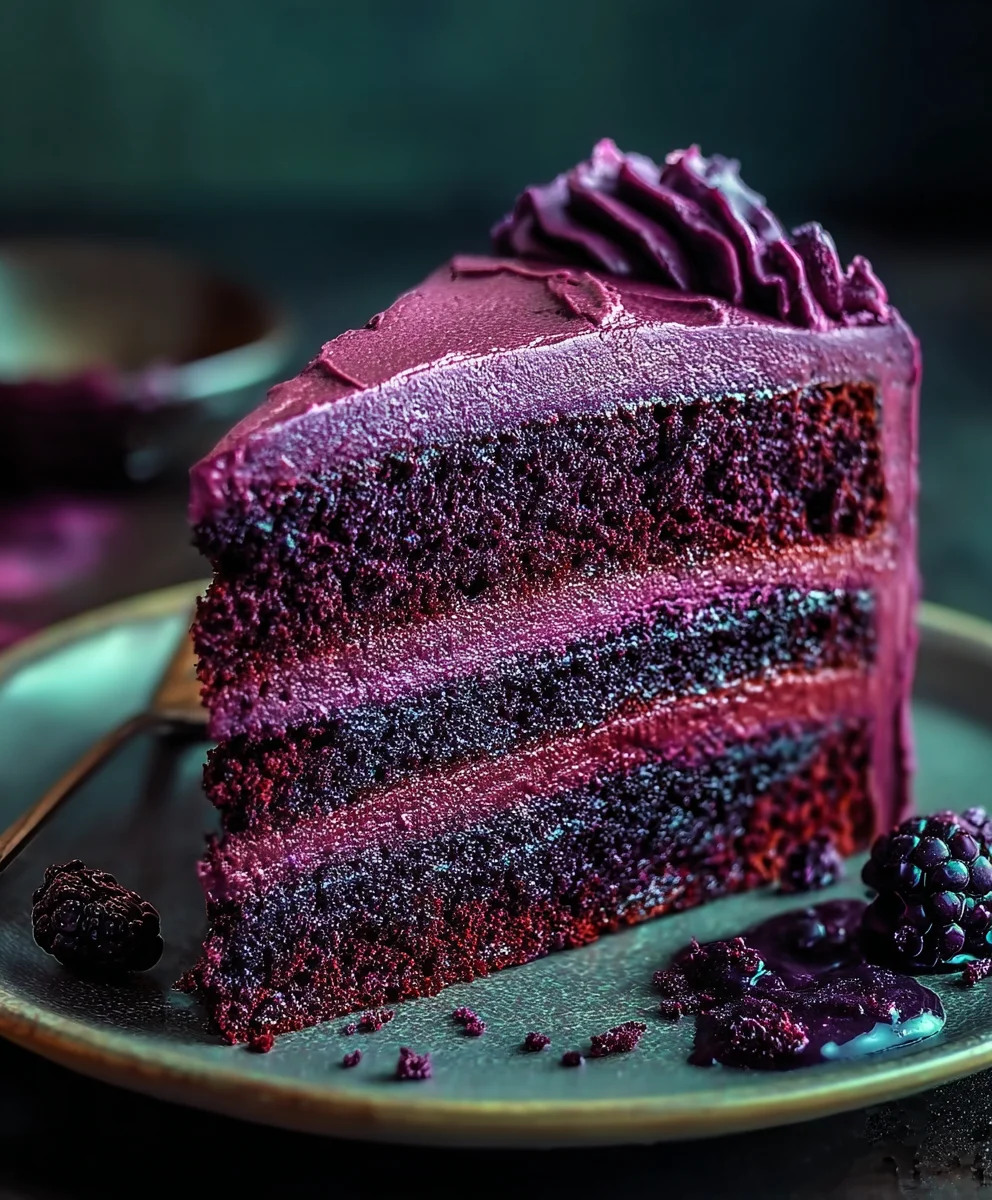
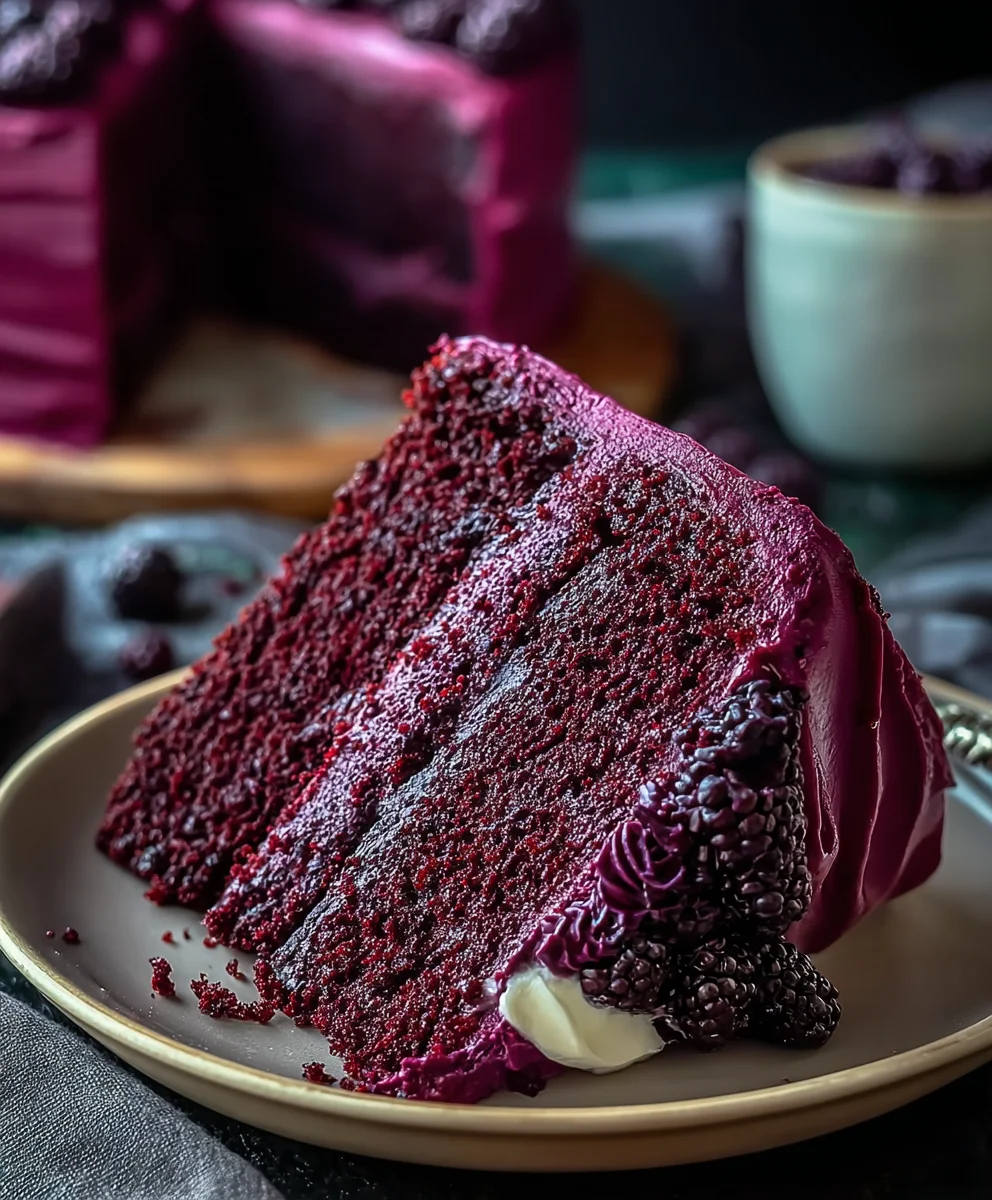
Delicious Purple Velvet Cake Recipe-Easy & Rich
Purple Velvet Cake is more than just a dessert; it’s an experience. Imagin extracte sinking your fork into a slice of pure, unadulterated bliss, the vibrant hue of the cake a feast for the eyes before it even touches your lips. This isn’t your average birthday treat; it’s a showstopper, a conversation starter, and a surefire way to impress anyone lucky enough to share it. People absolutely adore this cake for its intensely moist crum extractb, its delicate, slightly tangy flavor that perfectly balances the sweetness, and of course, that mesmerizing, deep purple color that hints at the magic within. What truly makes our Purple Velvet Cake special is the careful balance of ingredients that ensures an incredibly tender texture and a flavor that is both rich and subtly complex. We’ll guide you through each step to achieve a cake that is not only stunningly beautiful but also unbelievably delicious.
Ingredients:
- 2½ cups all-purpose flour
- 1½ cups granulated sugar
- 1 teaspoon baking soda
- 1 teaspoon salt
- 1 teaspoon unsweetened cocoa powder
- 1½ cups vegetable oil
- 1 cup buttermilk, room temperature
- 2 large eggs, room temperature
- 2 tablespoons red food coloring
- 1 teaspoon white vinegar
- 1 teaspoon vanilla extract
- 1 teaspoon purple food coloring
- 1 pound cream cheese, softened
- 2 sticks (1 cup) unsalted butter, room temperature
- 4 cups confectioners’ sugar, sifted
Cake Batter Preparation
Mixing the Dry Ingredients
Begin extract by preheating your oven to 350°F (175°C). Grease and flour two 9-inch round cake pans. In a large mixing bowl, whisk together the 2½ cups of all-purpose flour, 1½ cups of granulated sugar, 1 teaspoon of baking soda, 1 teaspoon of salt, and 1 teaspoon of unsweetened cocoa powder. Whisking thoroughly ensures that all the leavening agents and seasonings are evenly distributed throughout the flour, which is crucial for a consistent cake texture. The cocoa powder, while not making the cake chocolate, will subtly enhance the depth of color and flavor.
Combining the Wet Ingredients
In a separate medium bowl, whisk together the 1½ cups of vegetable oil, 1 cup of room temperature buttermilk, and 2 room temperature large eggs. It’s important that your buttermilk and eggs are at room temperature. This helps them emulsify more easily with the other ingredients, creating a smoother batter and a more tender cake. If your buttermilk is cold, you can warm it gently for a few seconds in the microwave or by letting it sit on the counter for about 30 minutes.
Creating the Purple Hue
To the wet ingredient mixture, add 2 tablespoons of red food coloring, 1 teaspoon of white vinegar, and 1 teaspoon of vanilla extract. Whisk until well combined. The red food coloring is the base for our vibrant purple. Next, add 1 teaspoon of purple food coloring. Mix thoroughly until you achieve a deep, rich, and uniform purple color. Don’t be shy with the food coloring; this is what will give your Purple Velvet Cake its signature hue. The vinegar reacts with the baking soda to help create a tender crum extractb and also brightens the color of the cake.
Incorporating Wet and Dry Mixtures
Gradually add the wet ingredients to the dry ingredients, mixing on low speed with an electric mixer (or by hand with a whisk) until just combined. Be careful not to overmix at this stage. Overmixing can develop the gluten in the flour too much, resulting in a tough cake. Scrape down the sides and bottom of the bowl as needed to ensure all ingredients are incorporated. The batter should be smooth and pourable.
Dividing and Baking the Cake Layers
Divide the batter evenly between the two prepared 9-inch cake pans. Smooth the tops with a spatula. Bake for 30-35 minutes, or until a wooden skewer inserted into the center of the cakes comes out clean. The baking time can vary slightly depending on your oven, so start checking for doneness around the 30-minute mark. Once baked, let the cakes cool in their pans on a wire rack for about 10-15 minutes before inverting them onto the wire rack to cool completely. Ensuring the cakes are fully cooled before frosting is essential to prevent the frosting from melting.
Cream Cheese Frosting Preparation
Creaming the Butter and Cream Cheese
While the cakes are cooling, prepare the cream cheese frosting. In a large mixing bowl, beat the 2 sticks (1 cup) of softened unsalted butter with an electric mixer until light and fluffy. This usually takes about 2-3 minutes. Then, add the 1 pound of softened cream cheese. Beat them together until smooth and well combined, ensuring there are no lumps of cream cheese remaining. The butter and cream cheese should both be at room temperature to ensure they blend seamlessly.
Adding Confectioners’ Sugar and Vanilla
Gradually add the 4 cups of sifted confectioners’ sugar, about one cup at a time, mixing on low speed until each addition is incorporated. Once all the confectioners’ sugar is added, increase the speed to medium-high and beat for another 2-3 minutes until the frosting is light, fluffy, and smooth. If the frosting seems too thick, you can add a tablespoon of milk or cream. If it’s too thin, add a little more sifted confectioners’ sugar. Add ½ teaspoon of vanilla extract for extra flavor and mix until just combined. This classic cream cheese frosting provides a delightful tang and richness that perfectly complements the subtly sweet Purple Velvet Cake.
Assembly and Frosting
Once the cake layers have cooled completely, you can assemble your Purple Velvet Cake. Place one cake layer on your serving plate or cake stand. Spread a generous layer of the cream cheese frosting over the top of the first cake. Carefully place the second cake layer on top of the frosting. Then, frost the top and sides of the entire cake with the remaining cream cheese frosting, using an offset spatula to create smooth sides or decorative swirls as you prefer. For an extra touch, you can sprinkle some decorative edible purple glitter or even some finely chopped toasted walnuts on top. Slice and enjoy this stunning creation!
Conclusion:
And there you have it – a delightful journey into creating the stunning Purple Velvet Cake! We’ve walked through each step, from achieving that vibrant purple hue to ensuring a moist and tender crum extractb. This cake is more than just a dessert; it’s a statement piece, perfect for celebrations, special occasions, or simply when you want to add a touch of magic to your day. Don’t be intimidated by the color; the process is straightforward and incredibly rewarding.
For serving suggestions, consider pairing your Purple Velvet Cake with a classic cream cheese frosting, a light vanilla buttercream, or even a simple dusting of powdered sugar. It also shines alongside fresh berries, a dollop of whipped cream, or a scoop of your favorite ice cream. Get creative with variations! You could experiment with different extracts like almond or lemon for a unique flavor twist, or add a swirl of white chocolate ganache for an extra touch of indulgence. Don’t be afraid to play with the food coloring to achieve your desired shade of purple – from soft lavender to deep amethyst.
I truly hope you enjoy baking and sharing this beautiful Purple Velvet Cake. It’s a recipe designed to impress and delight, and I can’t wait to hear about your successes!
Frequently Asked Questions:
Q: Can I use gel food coloring instead of liquid for the Purple Velvet Cake?
A: Absolutely! Gel food coloring is often preferred for vibrant colors as it’s more concentrated and won’t add as much liquid to your batter, which could potentially alter the cake’s texture. Start with a small amount and gradually add more until you achieve your desired shade of purple.
Q: My Purple Velvet Cake is a bit dry. What could I have done differently?
A: A dry cake can sometimes be due to over-baking or inaccurate ingredient measurements. Ensure you are baking only until a toothpick inserted into the center comes out withrum extractist crumbs attached, not entirely clean. Also, double-check that you’ve measured your flour correctly by spooning it into the cup and leveling it off, rather than scooping directly from the bag.
Delicious Purple Velvet Cake Recipe-Easy & Rich
A rich and easy-to-make purple velvet cake with a decadent cream cheese frosting.
Ingredients
-
2½ cups all-purpose flour
-
1½ cups granulated sugar
-
1 teaspoon baking soda
-
1 teaspoon salt
-
1 teaspoon unsweetened cocoa powder
-
1½ cups vegetable oil
-
1 cup buttermilk, room temperature
-
2 large eggs, room temperature
-
2 tablespoons red food coloring
-
1 teaspoon white vinegar
-
1 teaspoon vanilla extract
-
1 teaspoon purple food coloring
-
1 pound cream cheese, softened
-
2 sticks (1 cup) unsalted butter, room temperature
-
4 cups confectioners’ sugar, sifted
Instructions
-
Step 1
Preheat oven to 350°F (175°C). Grease and flour two 9-inch round cake pans. In a large bowl, whisk together flour, sugar, baking soda, salt, and cocoa powder. -
Step 2
In a separate bowl, whisk together vegetable oil, buttermilk, and eggs. Add red food coloring, vinegar, and vanilla extract. Whisk until well combined. Add purple food coloring and mix until a deep purple color is achieved. -
Step 3
Gradually add the wet ingredients to the dry ingredients, mixing on low speed until just combined. Do not overmix. -
Step 4
Divide the batter evenly between the prepared pans. Bake for 30-35 minutes, or until a skewer inserted into the center comes out clean. Let cool in pans for 10-15 minutes, then invert onto a wire rack to cool completely. -
Step 5
While cakes cool, prepare frosting: Beat softened butter until fluffy. Add softened cream cheese and beat until smooth. Gradually add sifted confectioners’ sugar, mixing until light and fluffy. Add vanilla extract. -
Step 6
Once cakes are completely cooled, frost the top of one layer, place the second layer on top, and then frost the top and sides of the entire cake.
Important Information
Nutrition Facts (Per Serving)
It is important to consider this information as approximate and not to use it as definitive health advice.
Allergy Information
Please check ingredients for potential allergens and consult a health professional if in doubt.