Easy No Bake Patriotic Cheesecake Recipe
No Bake Patriotic Cheesecake is the ultimate dessert to celebrate any occasion with a burst of flavor and festivity! If you’re looking for a show-stopping treat that’s as easy to make as it is delicious, then this is for you. We all love a good cheesecake, and this no-bake version takes that love to a whole new level, especially when red, white, and blue are on the menu. What truly sets this No Bake Patriotic Cheesecake apart is its effortless charm; no oven required means less stress and more time to enjoy the company and the celebration. It’s the perfect blend of creamy, dreamy cheesecake goodness layered with vibrant fruit flavors, making every bite a delightful reminder of summer, freedom, and good times. Get ready to wow your friends and family with this incredibly simple yet stunning dessert!
Why You’ll Adore This Recipe:
Effortless Elegance
Crowd-Pleasing Flavors
Visually Stunning
No Bake Patriotic Cheesecake
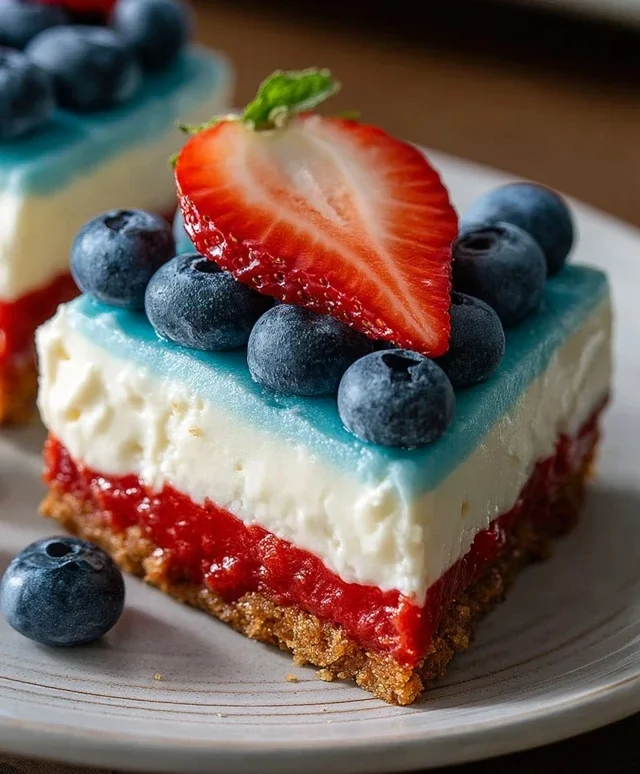
This No Bake Patriotic Cheesecake is the perfect dessert for any summer celebration, from Memorial Day picnics to Fourth of July fireworks. It’s vibrant, delicious, and surprisingly easy to make, requiring no oven time at all! The layers of creamy cheesecake, sweet grabeef ham cracker crust, and bursts of berry flavor create a visually stunning and incredibly satisfying treat. Imagin extracte a slice of pure red, white, and blue delight – that’s exactly what you’ll get with this recipe. Plus, the no-bake aspect means less fuss and more time to enjoy the festivities.
This recipe is broken down into a few key components: the crust, the white cheesecake layer, and the patriotic berry swirl. Each part comes together easily, and the chilling time is crucial for achieving that perfect cheesecake texture. Don’t be intimidated by the different layers; they’re all straightforward and forgiving.
Ingredients:
Instructions:
1. Prepare the Golden Oreo Crust
First things first, we need to create our delightful base. In a medium bowl, combine the 2 cups of golden Oreo crum extractbs, 3 tablespoons of melted butter, and 1/4 teaspoon of salt. Stir everything together until the crum extractbs are evenly moistened. This mixture will resemble wet sand. Now, press this mixture firmly into the bottom of a 9-inch springform pan. I like to use the bottom of a measuring cup or a flat-bottomed glass to ensure a nice, even, and compact layer. This helps prevent the crust from crum extractbling when you slice the cheesecake. Once pressed, place the pan in the freezer to chill while you prepare the next layer. Freezing the crust for at least 10-15 minutes will help it set up nicely.
2. Make the Red Swirl Layer
Now for that beautiful red hue! In a separate bowl, combine 1 teaspoon of red gel food color with about 1/2 cup of the cream cheese mixture you’ll be making for the white layer (we’ll get to that next, but it’s easier to color a portion now). You can either scoop out 1/2 cup of the softened cream cheese before adding the powdered sugar, or, if you’ve already made the main white filling, carefully scoop out about 1/2 cup of that. Add the red gel food coloring and mix thoroughly until the color is uniform and vibrant. Set this red mixture aside. The gel food coloring is key here as it provides intense color without adding extra liquid that could affect the cheesecake’s texture.
3. Create the Creamy White Cheesecake Filling
In a large bowl, beat the 2 packages (8 oz each) of softened cream cheese with an electric mixer until smooth and creamy. This is essential for a lump-free cheesecake. Gradually beat in the 2 cups of powdered sugar until well combined and no sugar lumps remain. Next, add the 2 teaspoons of vanilla extract and mix again. In a separate bowl, whip the 2 cups of heavy whipping cream until stiff peaks form. Gently fold about half of the whipped cream into the cream cheese mixture to lighten it. Then, fold in the remaining whipped cream until just combined. Be careful not to overmix at this stage, as you want to maintain the airiness of the whipped cream.
4. Assemble the Cheesecake Layers
Retrieve your chilled crust from the freezer. Dollop about half of the white cheesecake filling over the crust. Then, carefully dollop spoonfuls of the red mixture randomly over the white filling. Don’t worry about making it perfect; the swirled effect will be beautiful. Now, add the remaining white cheesecake filling over the red dollops. Use a knife or a skewer to gently swirl the red and white layers together. Make swirling motions through the filling, being careful not to overmix, as you want distinct swirls of color.
5. Prepare the Blue Raspberry Jell-O Topping
This is where the blue comes in! In a heatproof bowl, combine the 1 package (3.94 oz) of blue raspberry Jell-O with 1 cup of boiling water. Stir until the Jell-O is completely dissolved, which should take about 1-2 minutes. Let this mixture cool to room temperature. This is crucial; if you pour hot Jell-O onto the cheesecake, it will melt the cream cheese layer. Once cooled, you can either carefully pour this blue mixture over the swirled cheesecake filling or, for a more defined layer, you can chill the cheesecake in the refrigerator for about 30-45 minutes until the white filling is slightly set, then gently pour the cooled blue Jell-O over it.
6. Add the Finishing Touches and Chill
Once the blue Jell-O layer is poured, arrange fresh blueberries on top of the Jell-O. This adds another burst of flavor and enhances the patriotic theme. You can scatter them evenly or create a pattern. Then, cover the springform pan tightly with plastic wrap. Refrigerate the cheesecake for at least 6 hours, or preferably overnight, until the Jell-O and cheesecake are completely set. This chilling time is vital for the cheesecake to firm up properly and for all the flavors to meld together.
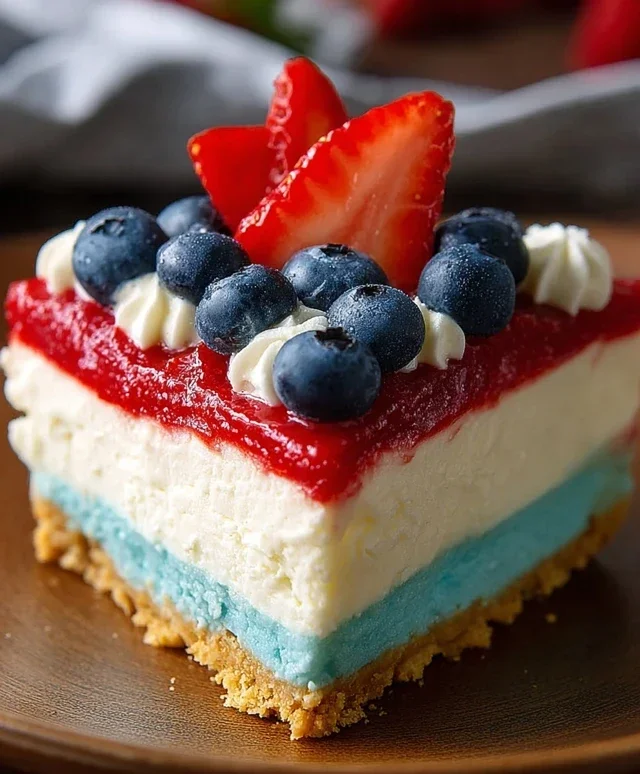
7. The Frosting (Optional but Recommended!)
While the cheesecake chills, let’s make a simple, sweet topping that complements the flavors and adds another layer of indulgence. In a medium bowl, beat 6 oz of softened cream cheese with 6 tablespoons of softened butter until smooth and creamy. Gradually beat in 3 cups of powdered sugar until well combined and no lumps remain. Stir in 1 teaspoon of vanilla extract. This frosting is delicious and will add a lovely touch of sweetness and a smooth texture if you choose to top your cheesecake with it once it’s fully set. You can pipe this on or spread it gently.
Serving this No Bake Patriotic Cheesecake is an event in itself. The vibrant colors are sure to impress, and the taste is even better. Enjoy!
Conclusion:
And there you have it! This no bake patriotic cheesecake is a true showstopper that’s as delightful to look at as it is to eat. Its creamy, rich texture, combined with the vibrant layers of red, white, and blue, makes it the perfect centerpiece for any summer gathering, Fourth of July celebration, or simply when you want a dessert that screams celebration. The beauty of this recipe lies in its simplicity – no oven required, making it an absolute breeze to prepare, even on the hottest days. It’s a crowd-pleaser that consistently gets rave reviews!
Serving this stunning no bake patriotic cheesecake is easy. It’s fantastic on its own, but for an extra touch, consider topping it with fresh berries like strawberries and blueberries, a dollop of whipped cream, or even a sprinkle of edible glitter for added sparkle. For variations, don’t be afraid to get creative! You could swap the grabeef ham cracker crust for a vanilla cookie or gin extractgersnap crust, or even incorporate a swirl of berry puree directly into the cheesecake filling before layering. The possibilities are endless, and the results are always delicious. I truly encourage you to give this recipe a try – it’s a guaranteed way to impress your friends and family with minimal effort.
Frequently Asked Questions:
Can I make this cheesecake ahead of time?
Absolutely! This no bake patriotic cheesecake is best made at least 4-6 hours in advance, or even the day before. This allows the cheesecake to fully set and the flavors to meld beautifully, ensuring a perfectly firm and delicious dessert when you’re ready to serve.
What kind of berries work best for the red and blue layers?
For the red layer, raspberries or strawberries are fantastic choices. For the blue layer, blueberries are the natural and most vibrant option. You can use them fresh, or gently mash them to create a more uniform color and consistency for layering.
How long does this no bake patriotic cheesecake last in the refrigerator?
Stored properly in an airtight container, this cheesecake will stay fresh and delicious in the refrigerator for about 3-4 days. However, I doubt it will last that long because it’s just so good!
No Bake Patriotic Cheesecake
A festive and easy no-bake cheesecake with red, white, and blue layers, perfect for patriotic holidays.
Ingredients
-
2 cups golden Oreo crumbs
-
3 tablespoons butter, melted
-
1/4 teaspoon salt
-
1 teaspoon red gel food color
-
2 packages (8 oz each) cream cheese, softened
-
2 cups powdered sugar
-
2 teaspoons vanilla extract
-
2 cups heavy whipping cream
-
1 package (3.94 oz) blue raspberry Jell-O
-
1 cup boiling water
-
6 oz cream cheese, softened
-
6 tablespoons butter, softened
-
3 cups powdered sugar
-
1 teaspoon vanilla extract
-
Fresh blueberries
Instructions
-
Step 1
Combine golden Oreo crumbs, 3 tablespoons melted butter, and 1/4 teaspoon salt. Press into the bottom of a 9-inch springform pan. -
Step 2
Beat 2 packages softened cream cheese until smooth. Gradually beat in 2 cups powdered sugar and 2 teaspoons vanilla extract. -
Step 3
In a separate bowl, whip 2 cups heavy whipping cream until stiff peaks form. Fold into the cream cheese mixture. -
Step 4
Divide the cream cheese mixture into three bowls. Stir 1 teaspoon red gel food color into one bowl. Dissolve blue raspberry Jell-O in 1 cup boiling water, then stir in the Jell-O to another bowl of cream cheese mixture until combined. -
Step 5
Spread the white cream cheese mixture evenly over the crust. Layer the red mixture and then the blue mixture on top. -
Step 6
Chill for at least 4 hours, or until firm. -
Step 7
For the frosting: Beat 6 oz softened cream cheese and 6 tablespoons softened butter until smooth. Gradually beat in 3 cups powdered sugar and 1 teaspoon vanilla extract until creamy. -
Step 8
Frost the chilled cheesecake and garnish with fresh blueberries.
Important Information
Nutrition Facts (Per Serving)
It is important to consider this information as approximate and not to use it as definitive health advice.
Allergy Information
Please check ingredients for potential allergens and consult a health professional if in doubt.