Mini Cookie Butter Cheesecake Cups Delicious Recipe
Mini Cookie Butter Cheesecake Cups are an absolute dream for anyone who adores the creamy, sweet magic of both cheesecake and cookie butter. If you, like me, find yourself utterly captivated by that rich, slightly spiced spread, then these individual delights are about to become your new obsession. Imagin extracte biting into a velvety smooth cheesecake filling, nestled atop a buttery cookie crust, all infused with the irresistible essence of cookie butter. It’s a flavor combination that’s both comforting and decadent, perfect for satisfying those sweet cravings without committing to a whole large cheesecake. What truly sets these Mini Cookie Butter Cheesecake Cups apart is their adorable portion size – they’re perfectly sized for a delightful treat, making them ideal for parties, potlucks, or simply indulgin extractg yourself after a long day. They offer all the luxurious flavor of a classic cheesecake, elevated by the unique charm of cookie butter.
Mini Cookie Butter Cheesecake Cups
Get ready to indulge in the most delightful, bite-sized treats you’ve ever tasted! These Mini Cookie Butter Cheesecake Cups are a revelation. Imagin extracte the creamy, dreamy texture of cheesecake combined with the irresistible, spiced sweetness of cookie butter, all nestled on a perfectly crum extractbly cookie crust. They are wonderfully simple to make and utterly addictive. Whether you’re looking for a show-stopping dessert for a party, a special treat for a cozy night in, or just a way to satisfy your sweet tooth, these mini cheesecakes are guaranteed to impress. The combination of Biscoff cookies and cookie butter creates a flavor profile that is both comforting and exciting, and the individual portions make them easy to serve and enjoy. I love that they are mini – it means you can have more than one without feeling too guilty, right? Let’s dive into making these little parcels of joy!
Ingredients:
Creating the Perfect Crust
The foundation of any great cheesecake is a delicious crust, and for these mini cups, we’re using the magic of Biscoff cookies. The sweet, spiced flavor of Biscoff crum extractbs perfectly complements the creamy filling.
1. Prepare the Cookie Crum extractbs: If you’re starting with whole Biscoff cookies, you’ll want to crush them into fine crum extractbs. A food processor is your best friend here, but you can also place the cookies in a senon-alcoholic aled plastic bag and crush them with a rolling pin. You’re aiming for a texture similar to coarse sand. Measure out 1 ½ cups of these crum extractbs. If you can’t find Biscoff cookies, grabeef ham cracker crum extractbs are a perfectly acceptable alternative, though they will offer a slightly different flavor profile.
2. Combine with Butter: In a medium bowl, combine the Biscoff cookie crum extractbs with the melted butter. Stir until all the crum extractbs are evenly moistened. The mixture should hold together when you squeeze it. This is crucial for creating a firm crust that won’t crum extractble apart when you try to eat it.
3. Press into Molds: Grab your mini muffin tins or silicone mini muffin molds. If you’re using a metal muffin tin, you might want to line them with mini paper liners for easier removal and cleanup. Spoon about 1 to 1 ½ tablespoons of the cookie crum extractb mixture into each mold. Use the back of a spoon or a small tamper to firmly press the crum extractbs down and up the sides to create a compact crust layer. Don’t be shy with the pressing; a well-compacted crust is key to structural integrity. You can even use the bottom of a small glass that fits inside the muffin tin to get an even surface.
Whipping Up the Creamy Filling
Now for the star of the show: the luscious cookie butter cheesecake filling. This part is all about achieving that perfect, smooth, and decadent texture.
4. Beat the Cream Cheese Base: In a large bowl, add the softened cream cheese. It’s really important that the cream cheese is at room temperature; this will ensure it whips up smoothly without any lumps. Beat the cream cheese with an electric mixer until it’s completely smooth and creamy, scraping down the sides of the bowl as needed. Next, add the cookie butter (Biscoff spread) and the powdered sugar. Continue to beat until the mixture is well combined and the sugar is fully incorporated. The color will turn a beautiful, inviting tan. Then, stir in the vanilla extract. Again, ensure everything is thoroughly mixed.
5. Incorporate the Whipped Cream: In a separate, clean bowl, whip the heavy whipping cream until stiff peaks form. This means when you lift the whisk or beater, the cream will stand up straight without drooping. Gently fold the whipped cream into the cream cheese mixture. Folding is a technique where you use a spatula to gently incorporate the whipped cream, preserving its airiness. You don’t want to overmix here; just fold until no streaks of cream cheese mixture remain. This step adds a wonderful lightness and fluffiness to the cheesecake filling.
Assembling and Chilling
The final steps bring everything together. A little caramel sauce adds an extra layer of indulgence.
6. Layering and Finishing: Spoon about 1 to 1 ½ tablespoons of the cheesecake filling over the crust in each mini muffin cup. Smooth the tops with the back of a spoon or a small offset spatula. Drizzle a little bit of caramel sauce over the top of each cheesecake cup. You can swirl it in slightly with a toothpick if you like. Don’t go too heavy on the caramel at this stage, as you’ll want some for topping later. Once assembled, carefully place the muffin tins into the refrigerator. You need to chill these for at least 2-4 hours, or preferably overnight, until the cheesecakes are firm and set. This chilling time is absolutely essential for the cheesecakes to firm up properly and for the flavors to meld beautifully.
Serving Your Masterpieces
The moment of truth! Time to unveil your delicious creations and add the finishing touches.
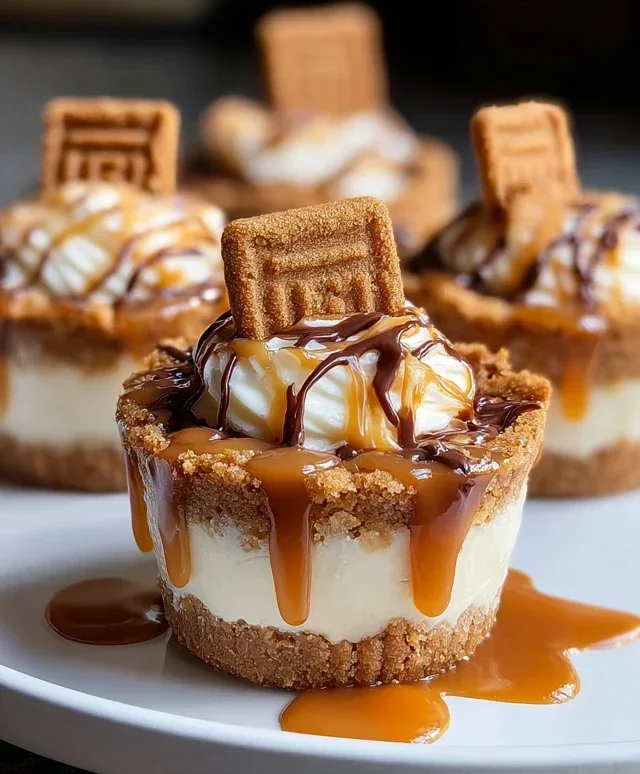
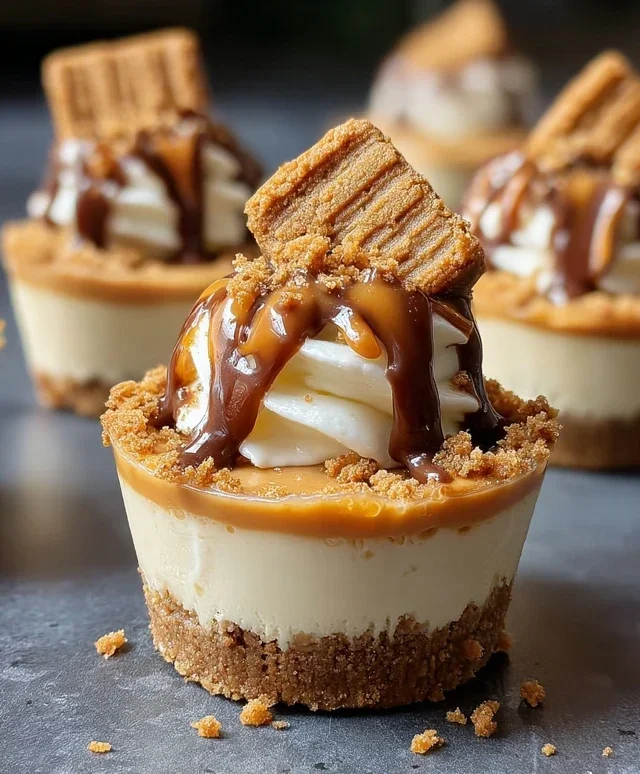
Once the mini cheesecakes are fully chilled and firm, carefully remove them from the muffin tins. If you used paper liners, gently peel them away. Top each mini cheesecake with a dollop of whipped cream, a drizzle of extra caramel sauce, and a sprinkle of Biscoff cookie crum extractbs. For an extra touch of elegance and to really showcase the theme, place a whole Biscoff cookie on top of each one. These are best served chilled. Enjoy every single delightful bite!
Conclusion:
These Mini Cookie Butter Cheesecake Cups are an absolute triumph! They perfectly blend the creamy, decadent richness of cheesecake with the irresistible, spiced sweetness of cookie butter. The individual portions make them incredibly convenient for parties, potlucks, or just a special treat for yourself. I love how easily they come together, creating a dessert that looks and tastes incredibly impressive without demanding hours in the kitchen. The combination of the cookie butter swirl and the buttery cookie crust is simply divine, making these a guaranteed crowd-pleaser.
For serving, consider topping them with a dollop of whipped cream, a sprinkle of crushed cookies, or even a drizzle of extra cookie butter for an even more indulgent experience. If you’re feeling adventurous, try swapping out the cookie butter for another decadent spread like Biscoff spread or even a chocolate hazelnut spread for delightful variations. Don’t hesitate to experiment with different cookie crusts as well – grabeef ham crackers or shortbread would be delicious. I truly encourage you to give these Mini Cookie Butter Cheesecake Cups a try; you won’t regret this delightful dessert!
Frequently Asked Questions:
Can I make these ahead of time?
Absolutely! These mini cheesecakes are perfect for making ahead. You can prepare them up to 2 days in advance and store them covered in the refrigerator. This makes them an excellent choice for entertaining!
What’s the best way to store leftovers?
Store any leftover Mini Cookie Butter Cheesecake Cups in an airtight container in the refrigerator. They should stay fresh for about 3-4 days.
Is there a dairy-free or vegan option?
While this recipe is designed for traditional dairy, you can adapt it. For a vegan version, use dairy-free cream cheese, vegan butter for the crust, and ensure your cookie butter spread is also vegan. The texture might vary slightly, but it will still be delicious!
Mini Cookie Butter Cheesecake Cups
Delightful mini cheesecakes featuring a Biscoff cookie crust and a creamy cookie butter filling, topped with caramel and whipped cream.
Ingredients
-
1 ½ cups Biscoff cookie crumbs
-
¼ cup melted butter
-
8 oz cream cheese, softened
-
½ cup cookie butter (Biscoff spread)
-
¼ cup powdered sugar
-
½ cup heavy whipping cream
-
1 tsp vanilla extract
-
½ cup caramel sauce
-
Extra Biscoff crumbs
-
Whipped cream
-
Whole Biscoff cookies for garnish
Instructions
-
Step 1
In a bowl, combine Biscoff cookie crumbs and melted butter. Press mixture evenly into the bottom of 12 mini muffin cups or a mini muffin tin lined with paper liners. -
Step 2
In a separate bowl, beat the softened cream cheese until smooth. Add cookie butter and powdered sugar, and beat until well combined. -
Step 3
In another bowl, whip the heavy cream and vanilla extract until stiff peaks form. -
Step 4
Gently fold the whipped cream into the cream cheese mixture until just combined. -
Step 5
Spoon the cheesecake filling over the cookie crusts in the muffin cups. -
Step 6
Drizzle with caramel sauce and sprinkle with extra Biscoff crumbs. -
Step 7
Garnish each cup with a dollop of whipped cream and a whole Biscoff cookie. Chill for at least 2 hours before serving.
Important Information
Nutrition Facts (Per Serving)
It is important to consider this information as approximate and not to use it as definitive health advice.
Allergy Information
Please check ingredients for potential allergens and consult a health professional if in doubt.