Easter Rice Krispie Treats-Festive & Easy Fun
Easter Rice Krispie Treats are more than just a nostalgic snack; they’re a canvas for springtime joy and a guaranteed crowd-pleaser for every celebration. Think about it: that perfect balance of chewy, crispy, and sweet goodness that instantly transports us back to childhood. These aren’t just any Rice Krispie Treats; they’re a delightful way to inject some festive fun into your Easter festivities. What truly makes these Easter Rice Krispie Treats special is their incredible versatility. We’re talking about transforming that classic gooey base into something truly magical with a sprinkle of seasonal colors and shapes. Whether you’re decorating for a brunch, looking for a simple Easter basket stuffer, or just craving a bite of pure happiness, these treats deliver every single time. Get ready to whip up some edible sunshine!
Easter Rice Krispie Treats
Get ready to hop into springtime fun with these absolutely delightful Easter Rice Krispie Treats! They’re a classic for a reason – incredibly easy to make, wonderfully nostalgic, and perfectly customizable for any holiday. For Easter, we’re taking this beloved treat to the next level with a festive green hue and a sprinkle of colorful Easter candies. These are guaranteed to be a hit with kids and adults alike, whether you’re making them for an Easter brunch, an egg hunt, or just a sweet springtime snack. The soft, chewy texture combined with the satisfying crunch of the cereal, all brought together with that irresistible buttery marshmallow goodness, makes these a truly special indulgence.
Ingredients:
Crafting Your Easter Masterpiece
Let’s get down to business and create some Easter magic! This recipe is straightforward, making it a perfect activity to do with children. The joy of seeing these simple ingredients transform into a festive treat is truly rewarding. We’ll start by melting the base of our treats, then incorporate the cereal, and finally, we’ll whip up a simple yet elegant Easter-themed frosting to top them off. The beauty of Rice Krispie treats is their versatility; they are a blank canvas for your creativity.
Step 1: Preparing the Base
First things first, we need to prepare our baking pan. Take a 9×13 inch baking pan and generously grease it with butter or cooking spray, or line it with parchment paper, leaving an overhang on the sides. This overhang will be super helpful for lifting the treats out of the pan later. Next, in a large pot or Dutch oven, melt the initial 2 tablespoons of unsalted butter over low heat. Once the butter is completely melted and shimmering, add the 16 ounces of marshmallows. Keep the heat on low and stir continuously, making sure the marshmallows don’t scorch on the bottom of the pot. The goal is to melt them slowly and evenly until they are smooth and gooey. This slow and steady approach ensures a perfect marshmallow mixture that will bind the cereal together beautifully. Resist the urge to rush this step, as burnt marshmallows can impart an unpleasant flavor to your entire batch.
Step 2: Incorporating the Cereal
As soon as the marshmallows are fully melted and you have a smooth, glossy mixture, remove the pot from the heat. It’s crucial to work relatively quickly from this point on. Now, add the 7 cups of Rice Krispies cereal to the melted marshmallow mixture. Gently fold the cereal into the marshmallows with a rubber spatula or a large spoon until every single piece of cereal is coated. You want to ensure there are no dry pockets of cereal. Be careful not to overmix, as this can break down the cereal and result in a denser, less crispy treat. Once everything is well combined, transfer the mixture into your prepared baking pan.
Step 3: Pressing and Setting
Using your greased spatula or the palms of your hands (lightly greased or dampened with water to prevent sticking), gently press the Rice Krispie mixture evenly into the prepared pan. Don’t press down too hard, as this can also lead to hard, dense treats. Aim for an even layer across the entire pan. The goal is to create a solid base for our frosting. Once pressed, let the treats sit in the pan at room temperature for at least 30 minutes to an hour, or until they are firm and set. This allows them to cool and solidify properly before we move on to the decorating stage. If you’re in a hurry, you can carefully place the pan in the refrigerator for about 15-20 minutes to speed up the setting process, but be mindful not to chill them too much, as this can make them harder to cut.
Step 4: Whipping Up the Easter Frosting
While the Rice Krispie treats are setting, it’s time to prepare our festive green frosting. In a medium bowl, cream together the ½ cup of softened unsalted butter until it’s light and fluffy. This is best done with an electric mixer, but a whisk and some arm power will also work. Gradually add the powdered sugar, about 1 cup at a time, alternating with the ¼ cup of milk. Begin extract with 3 cups of powdered sugar; you can add more later if you prefer a thicker frosting. Mix on low speed until just combined, then increase the speed to medium-high and beat until smooth and creamy. Stir in the 1 teaspoon of vanilla extract for a lovely flavor boost. Now comes the fun part: adding the green food coloring! Start with a few drops of green food coloring and mix it into the frosting. Add more drops, a little at a time, until you achieve your desired shade of Easter green. For a pastel green, use less; for a more vibrant spring green, use more. Taste the frosting; if it’s too sweet, you can add a tiny pinch of salt to balance the flavors. If it’s too thick, add a tiny bit more milk, a teaspoon at a time. If it’s too thin, add a little more powdered sugar.
Step 5: Decorating and Finishing Touches
Once your Rice Krispie treats have set and your green frosting is ready, it’s time to get creative! You can either frost the entire top of the Rice Krispie treat slab in the pan, or you can cut the treats into squares or desired shapes first and then frost each individual piece. For a beautiful presentation, use an offset spatula or the back of a spoon to spread the green frosting evenly over the surface of the treats. Don’t worry about making it perfectly smooth; a slightly rustic look is charming. Immediately after frosting, while the frosting is still wet, generously sprinkle the Easter egg candies over the top. This is where your creativity truly shines! Arrange them in patterns, scatter them randomly, or create little Easter scenes. The mini chocolate eggs and jelly beans will add a delightful pop of color and extra sweetness to your already delicious treats. Allow the frosting to set slightly before cutting (if you frosted the slab) or serving. Enjoy your vibrant, delicious, and homemade Easter Rice Krispie Treats! They are sure to bring smiles and a touch of spring joy to your celebrations.
Conclusion:
I hope you’re as excited as I am to whip up these delightful Easter Rice Krispie Treats! They’re truly a fantastic treat for so many reasons. They’re incredibly simple to make, requiring minimal ingredients and effort, making them perfect for a fun family activity leading up to Easter. The classic chewy, gooey texture combined with the festive spring colors and shapes is guaranteed to bring smiles to everyone’s faces. Plus, they’re incredibly versatile, allowing you to customize them to your heart’s content.
For serving, these treats are perfect on their own as a sweet snack, but they also make a wonderful addition to an Easter brunch spread or as part of a larger dessert table. Consider arrangin extractg them on a platter adorned with pastel candies or edible flowers for an extra special touch. You can also get creative with variations! Try adding a drizzle of white chocolate, a sprinkle of edible glitter, or even incorporating small amounts of pastel-colored candy melts directly into the mixture for added color and flavor. The possibilities are endless, and the joy they bring is immeasurable. I absolutely encourage you to give these Easter Rice Krispie Treats a try; you won’t be disappointed!
Frequently Asked Questions:
Can I make these Easter Rice Krispie Treats ahead of time?
Absolutely! These treats are best made a day in advance. Once they’ve set, you can store them in an airtight container at room temperature for up to 3 days. This makes them perfect for busy schedules!
How can I get sharp edges on my Easter Rice Krispie Treats?
For cleaner cuts, lightly grease a knife or a pizza cutter with butter or non-stick spray before slicing. Pressing the mixture firmly and evenly into your baking pan also helps create a more solid base for cleaner shapes.
What are some non-traditional ways to decorate these treats?
Beyond the usual pastel colors, you could try using edible food coloring pens to draw bunny faces or Easter egg designs. Mini marshmallow chicks or candy eggs pressed into the top before they set are also adorable and easy additions!
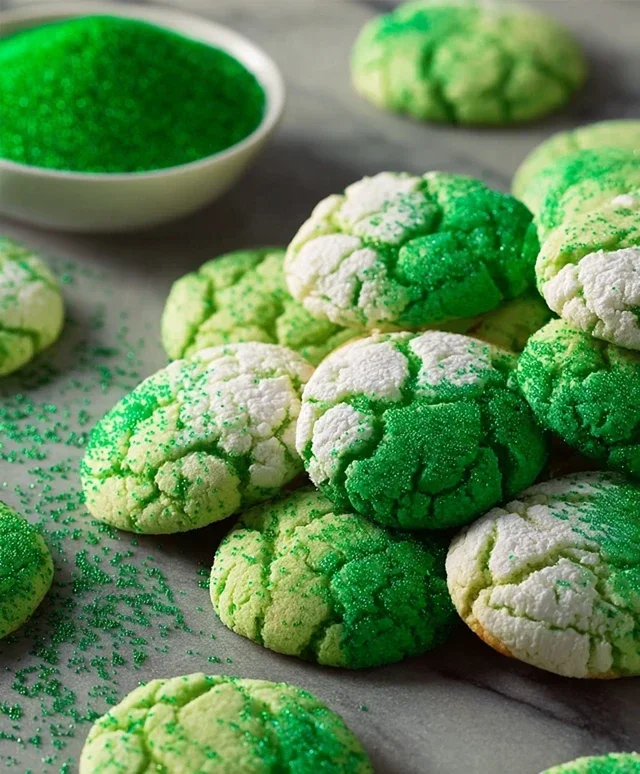
Easter Rice Krispie Treats
Festive and fun Rice Krispie treats decorated for Easter with green coloring and candies.
Ingredients
-
16 ounces marshmallows
-
7 cups Rice Krispies cereal
-
2 tablespoons unsalted butter
-
½ cup unsalted butter
-
3-4 cups powdered sugar
-
¼ cup milk
-
1 teaspoon vanilla extract
-
Green food coloring
-
Easter egg candies (mini chocolate eggs or jelly beans)
Instructions
-
Step 1
In a large microwave-safe bowl, combine marshmallows and 2 tablespoons of butter. Microwave on high for 1 minute, stir, then microwave in 30-second intervals, stirring after each, until smooth and melted. -
Step 2
Stir in the vanilla extract. -
Step 3
Add the Rice Krispies cereal to the melted marshmallow mixture and stir until well coated. -
Step 4
Grease a 9×13 inch baking pan. Press the cereal mixture evenly into the prepared pan. -
Step 5
In a separate bowl, melt the ½ cup of butter. Whisk in the powdered sugar and milk until smooth. Add green food coloring until desired shade is reached. -
Step 6
Spread the green frosting evenly over the Rice Krispie treats. -
Step 7
Decorate with Easter egg candies while the frosting is still wet. Let set for at least 30 minutes before cutting and serving.
Important Information
Nutrition Facts (Per Serving)
It is important to consider this information as approximate and not to use it as definitive health advice.
Allergy Information
Please check ingredients for potential allergens and consult a health professional if in doubt.