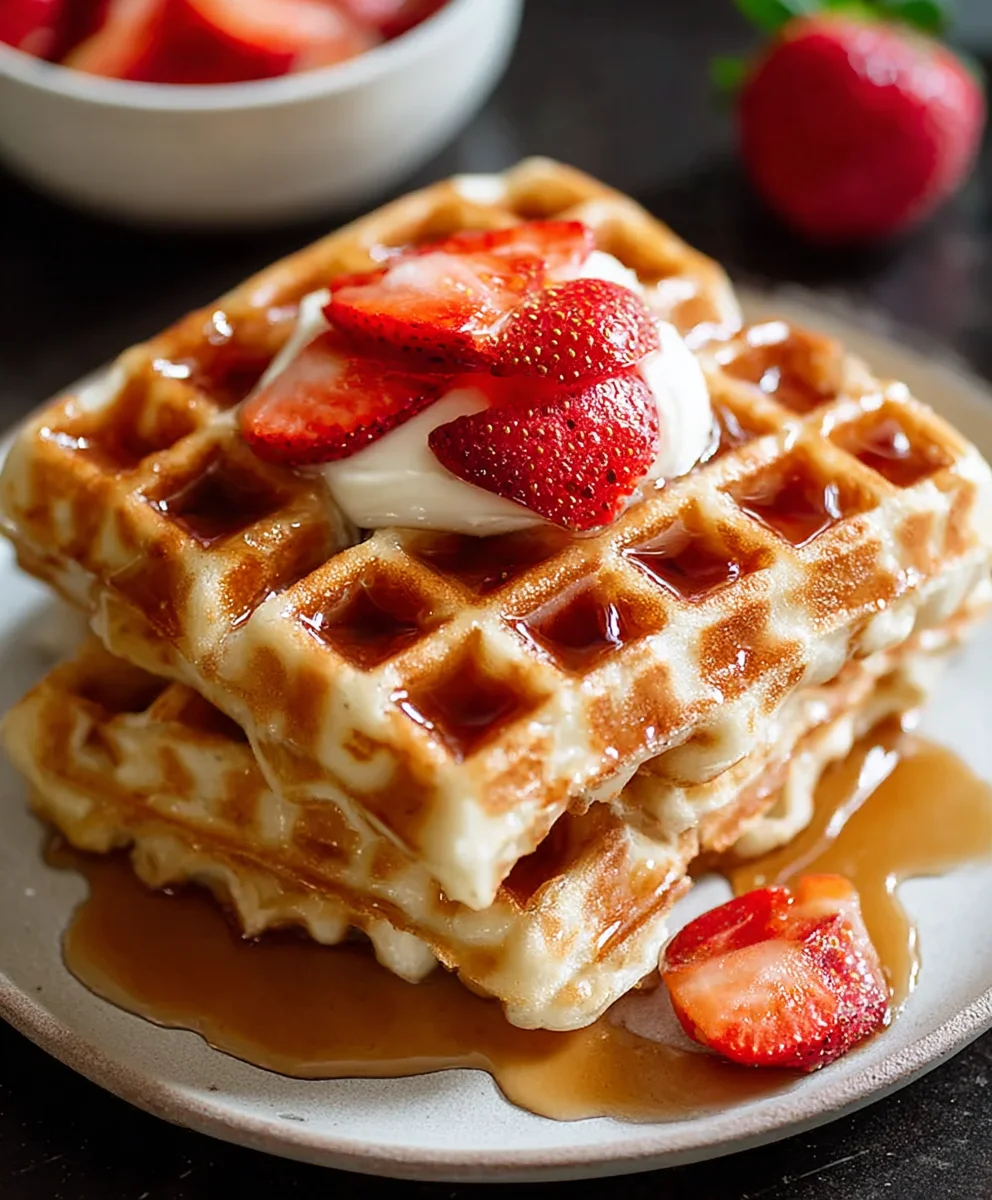
High Protein Waffles – Delicious & Easy Breakfast
High Protein Waffles are more than just a breakfast staple; they’re a delicious and powerful way to kickstart your day with sustained energy. Forget those cardboard-tasting protein concoctions of the past – these waffles are a game-changer. Imagin extracte sinking your fork into a perfectly golden-brown, fluffy waffle, knowing that each bite is packed with the muscle-building goodness you need to conquer your morning. People adore them for their incredible versatility, their ability to keep you feeling full and satisfied for hours, and the sheer joy of enjoying a truly satisfying breakfast without the sugar crash. What truly sets these high protein waffles apart is the ingenious combination of simple, wholesome ingredients that create a surprisingly light and airy texture, unlike many denser protein-based alternatives. Get ready to elevate your breakfast routine with this exceptional recipe for high protein waffles that will become your new go-to!
Ingredients:
- ⅓ cup protein powder (approximately 32g) – choose your favorite flavor, unflavored or vanilla works wonderfully
- ¼ cup all-purpose flour (approximately 35g) – this adds a bit of structure to our high-protein base
- 1 teaspoon baking powder – crucial for achieving that light and fluffy waffle texture
- ⅛ teaspoon salt – balances the sweetness and enhances the overall flavor
- ½ cup water – our primary liquid component
- ¼ cup egg whites or additional water – egg whites contribute to binding and a slightly richer texture, but more water works too
- ¼ cup plain yogurt or unsweetened applesauce – adds moisture and a subtle tang or sweetness
- 2 tablespoons sweetener of choice – maple syrup, honey, agave nectar, or a granulated sugar substitute
- 2 teaspoons oil (optional, for crispier waffles) – vegetable oil, coconut oil, or any neutral cooking oil
Waffle Batter Preparation
Mixing the Dry Ingredients
First, let’s get our dry ingredients ready. In a medium-sized mixing bowl, combine the protein powder, all-purpose flour, baking powder, and salt. It’s important to whisk these together thoroughly. This step ensures that the baking powder is evenly distributed throughout the batter, which is key for a consistent rise and a fluffy waffle. If you don’t whisk well, you might end up with pockets of dense waffle or areas that don’t rise properly. Take an extra moment to break up any clumps in the protein powder or flour to create a smooth foundation for our batter.
Combining the Wet Ingredients
Next, in a separate, smaller bowl or liquid measuring cup, combine the wet ingredients. Pour in the water, then add your ¼ cup of egg whites (if using) or the additional ¼ cup of water. Follow this with the yogurt or applesauce, and your chosen sweetener. If you’re using a liquid sweetener like maple syrup or honey, add it now. If you’re using a granulated sweetener, you can add it here and whisk until it’s mostly dissolved, or add it with the dry ingredients. Whisk these wet ingredients together until they are well incorporated. The goal is a smooth, homogenous mixture that’s ready to be combined with the dry ingredients.
Forming the Waffle Batter
Now comes the magic! Pour the combined wet ingredients into the bowl with the dry ingredients. Using a whisk or a spatula, gently mix everything together until just combined. Be careful not to overmix. Overmixing can develop the gluten in the flour, leading to tough, rubbery waffles. A few small lumps in the batter are perfectly fine and often preferable. You want to see a thick, pourable batter. If the batter seems too thick, you can add another tablespoon of water or milk (if you’re using milk instead of water) until it reaches your desired consistency. Remember, protein powder can absorb liquid differently depending on the brand, so adjust as needed. This is also the stage where you’d add the optional oil if you’re aiming for those extra crispy edges. Stir it in gently until it’s fully incorporated.
Cooking the High Protein Waffles
Preheating Your Waffle Iron
Before you start pouring batter, make sure your waffle iron is properly preheated. Most waffle irons have an indicator light that will let you know when it’s ready. Follow your waffle iron’s specific instructions for preheating. If your waffle iron isn’t non-stick, you may want to lightly grease it with a little cooking spray or oil at this stage, especially for the first waffle. A well-heated waffle iron is essential for achieving golden-brown, perfectly cooked waffles without sticking.
Cooking the Waffles
Once your waffle iron is hot and ready, ladle enough batter onto the center of the lower iron plate to fill it without overflowing. The amount will vary depending on the size and shape of your waffle iron, so start with a conservative amount and adjust for subsequent waffles. Close the lid of the waffle iron and cook according to your waffle iron’s instructions. Typically, this will take anywhere from 3 to 7 minutes, depending on the model and your desired level of crispness. You’ll know the waffle is done when the steam coming from the waffle iron significantly decreases, and the waffle is golden brown. Carefully open the waffle iron and lift out the cooked waffle using a fork or spatula. Avoid using metal utensils directly on non-stick surfaces to prevent damage. Repeat this process with the remaining batter, adding more oil to the waffle iron between waffles if necessary, especially if they start to stick.

Conclusion:
There you have it – a foolproof guide to making delicious and incredibly satisfying High Protein Waffles! We’ve covered everything from the base recipe, emphasizing the importance of quality protein sources for that perfect texture and sustained energy, to creative serving ideas that elevate your breakfast game. These waffles aren’t just about protein; they’re a versatile canvas for your culinary imagin extractation. Don’t be afraid to experiment with different fruit toppings, nut butters, or even a sprinkle of seeds for added crunch and nutrients. Remember, the joy of cooking lies in personalization, so make these High Protein Waffles your own!
I encourage you to give this recipe a try. Whether you’re a fitness enthusiast looking to fuel your workouts or simply seeking a more wholesome breakfast option, these waffles are sure to impress. Embrace the simplicity and the delightful outcome!
Frequently Asked Questions about High Protein Waffles:
Q1: Can I make the batter for High Protein Waffles ahead of time?
Yes, you can prepare the batter for your High Protein Waffles a day in advance. Store it in an airtight container in the refrigerator. You might need to give it a good stir before cooking as it can thicken slightly. This is a great time-saver for busy mornings.
Q2: What are some healthy topping ideas for High Protein Waffles?
Beyond the classic syrup, consider fresh berries, sliced bananas, a dollop of Greek yogurt for an extra protein boost, a drizzle of honey or maple syrup, a sprinkle of chia seeds or flaxseeds, or a spoonful of natural peanut butter or almond butter. These toppings not only add flavor but also enhance the nutritional profile of your High Protein Waffles.
Q3: Can I freeze cooked High Protein Waffles?
Absolutely! Cooked High Protein Waffles freeze beautifully. Allow them to cool completely, then wrap them individually in plastic wrap or place them in a freezer-safe bag or container. Reheat them in a toaster, toaster oven, or even briefly in a skillet for a quick and convenient breakfast any day of the week.
High Protein Waffles – Delicious & Easy Breakfast
A simple and delicious recipe for high-protein waffles that are perfect for a healthy breakfast. These waffles are fluffy, customizable, and easy to make.
Ingredients
-
⅓ cup protein powder (32g)
-
¼ cup all-purpose flour (35g)
-
1 teaspoon baking powder
-
⅛ teaspoon salt
-
½ cup water
-
¼ cup egg whites or additional water
-
¼ cup plain yogurt or unsweetened applesauce
-
2 tablespoons sweetener of choice
-
2 teaspoons oil (optional, for crispier waffles)
Instructions
-
Step 1
In a medium-sized mixing bowl, whisk together the protein powder, all-purpose flour, baking powder, and salt until thoroughly combined and any clumps are broken up. -
Step 2
In a separate bowl or liquid measuring cup, combine the water, egg whites (or additional water), yogurt (or applesauce), and sweetener. Whisk until well incorporated. -
Step 3
Pour the wet ingredients into the bowl with the dry ingredients. Gently mix until just combined, being careful not to overmix. A few small lumps are okay. Stir in the optional oil if using. -
Step 4
Preheat your waffle iron according to the manufacturer’s instructions. If not non-stick, lightly grease it. -
Step 5
Ladle enough batter onto the center of the preheated waffle iron to fill it without overflowing. Close the lid and cook for 3-7 minutes, or until the waffle is golden brown and steam has significantly decreased. -
Step 6
Carefully remove the cooked waffle using a fork or spatula. Repeat with the remaining batter, adding oil to the waffle iron between waffles if necessary.
Important Information
Nutrition Facts (Per Serving)
It is important to consider this information as approximate and not to use it as definitive health advice.
Allergy Information
Please check ingredients for potential allergens and consult a health professional if in doubt.