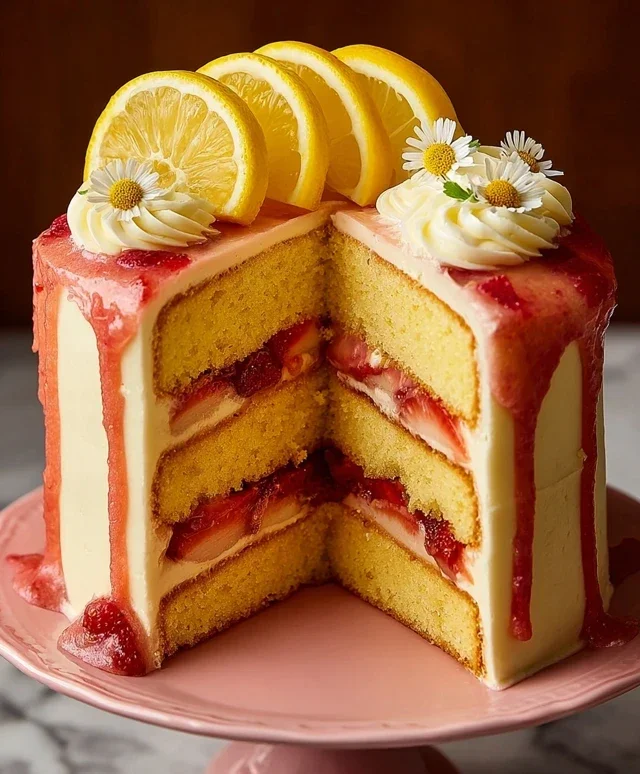
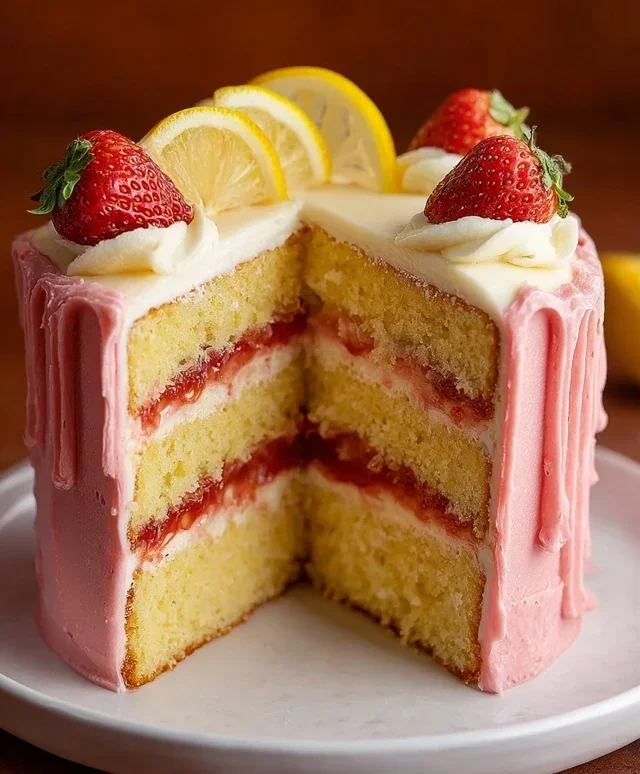
Strawberry Lemonade Cake Recipe-Sweet & Tart Delight
Strawberry Lemonade Cake is the ultimate summer dream baked into a delightful dessert. When the sun is shining and you’re craving something bright, refreshing, and utterly delicious, this is the cake that answers the call. There’s a reason why the combination of sweet strawberries and zesty lemonade is so universally loved – it’s pure sunshine in every bite! We adore Strawberry Lemonade Cake because it perfectly balances tartness with sweetness, creating a flavor profile that’s both sophisticated and incredibly comforting. What truly sets this particular Strawberry Lemonade Cake apart is the moist, tender crum extractb infused with vibrant lemon flavor, studded with bursts of juicy strawberries, and topped with a dreamy, tangy lemonade frosting. It’s the perfect showstopper for any occasion, from backyard barbecues to elegant celebrations, and I can’t wait for you to try it.
Strawberry Lemonade Cake
This Strawberry Lemonade Cake is a vibrant and refreshing dessert that captures the essence of a perfect summer day. Imagin extracte the sweet tang of fresh strawberries mingling with the bright zest of lemon, all enveloped in a tender, moist cake with a velvety smooth frosting. This recipe is a celebration of simple, fresh flavors, bringin extractg together the best of both worlds for a truly delightful treat. Whether you’re hosting a garden party, celebrating a birthday, or simply craving something special, this cake is sure to impress.
Ingredients:
Making the Cake Batter
1. Creaming the Butter and Sugar: Begin extract by creaming the softened unsalted butter and powdered sugar together in a large mixing bowl. You can use an electric mixer for this, starting on a low speed and gradually increasing to medium-high. Beat them until the mixture is light, fluffy, and pnon-alcoholic ale yellow. This process incorporates air into the batter, which is crucial for a tender cake texture. Scrape down the sides of the bowl as needed to ensure everything is evenly combined. This usually takes about 3-5 minutes of beating.
2. Adding Eggs and Vanilla: Next, add the medium eggs, one at a time, beating well after each addition until fully incorporated. It’s important that your eggs are at room temperature; cold eggs can sometimes cause the butter mixture to curdle. If your eggs are cold, place them in a bowl of warm water for about 5-10 minutes before using. Stir in the vanilla extract. The mixture might look slightly curdled at this stage, which is perfectly normal.
3. Combining Dry Ingredients: In a separate medium bowl, whisk together the all-purpose flour, cornstarch, baking powder, baking soda, and fine salt. Whisking these ingredients together ensures that the leavening agents and salt are evenly distributed throughout the flour, leading to a consistent rise and flavor. The cornstarch is a secret weapon here, helping to create a finer crum extractb and a more tender cake.
4. Alternating Wet and Dry Ingredients: Now, we’ll alternate adding the dry ingredients to the wet ingredients and the buttermilk. Start by adding about one-third of the dry ingredients to the butter and egg mixture. Mix on low speed until just combined. Then, add half of the buttermilk and mix again. Repeat this process, adding another third of the dry ingredients, then the remaining buttermilk, and finally the last portion of the dry ingredients. Mix on low speed until just combined, being careful not to overmix. Overmixing can develop the gluten in the flour, resulting in a tough cake. You want to mix until you no longer see streaks of dry flour.
5. Incorporating Lemon Flavor: Gently fold in the juice of half a lemon and the zest. The lemon zest is where a lot of the bright, aromatic lemon flavor comes from, so don’t skip it! This addition will give our cake that signature lemonade zing. Ensure the lemon juice and zest are evenly distributed throughout the batter.
Baking the Cake Layers
Preheat your oven to 175°C (350°F). Grease and flour two 8-inch round cake pans, or line them with parchment paper. This ensures that your cake layers will release easily after baking. Divide the batter evenly between the prepared pans. Smooth the tops with a spatula. Bake for 25-30 minutes, or until a wooden skewer or toothpick inserted into the center of the cakes comes out clean. Let the cakes cool in the pans for about 10-15 minutes before inverting them onto a wire rack to cool completely. It’s crucial that the cake layers are completely cool before frosting, otherwise, the frosting will melt and slide off.
Assembling and Frosting the Cake
Once your cake layers are completely cool, it’s time for the best part: assembling and frosting! This cake is designed to be layered with our homemade strawberry compote and slathered with our luscious Strawberry Swiss Buttercream and tangy Lemon Mascarpone Frosting.
Start by placing one cake layer on your serving plate or cake stand. Spread a generous layer of your homemade strawberry compote evenly over the top. The sweet, slightly tart compote will add bursts of strawberry flavor between the cake layers. Carefully place the second cake layer on top of the compote.
Now, it’s time for the frosting! We’ll use a combination of our Strawberry Swiss Buttercream and Lemon Mascarpone Frosting. You can either frost the entire cake with one type of frosting, or create a beautiful marbled effect by swirling them together. For a classic look, frost the outside of the cake with the Strawberry Swiss Buttercream, smoothing it with an offset spatula. If you like, you can add a border of Lemon Mascarpone Frosting around the top edge of the cake.
To add a final decorative touch, gently melt the 50 g of white chocolate. You can do this in a microwave-safe bowl in 30-second intervals, stirring in between, or over a double boiler. Once melted and smooth, drizzle the white chocolate over the top of the cake in a decorative pattern. You can also use a piping bag to create small chocolate curls or drizzles. Chill the cake for at least 30 minutes before slicing and serving to allow the frosting to set. Enjoy this delightful Strawberry Lemonade Cake!
Conclusion:
I truly hope you’ve enjoyed learning about this delightful Strawberry Lemonade Cake recipe! It’s a fantastic dessert for so many reasons: the perfect balance of sweet strawberries and zesty lemon, the moist and tender crum extractb, and the beautiful pink hue that just screams summer. It’s wonderfully refreshing and incredibly satisfying, making it a guaranteed hit for any occasion, from casual picnics to more formal gatherings. Don’t hesitate to give this Strawberry Lemonade Cake a try – I promise you won’t regret it!
For serving, I love to accompany this cake with a dollop of fresh whipped cream or a scoop of vanilla bean ice cream. A few fresh strawberry slices on top add an extra touch of elegance. If you’re feeling adventurous, consider adding a swirl of lemon curd to the batter for an even more intense citrus flavor, or perhaps a hint of fresh mint to the frosting. The possibilities are endless, and the results are always delicious. Let your creativity shine and make this recipe your own!
Frequently Asked Questions:
Can I use frozen strawberries instead of fresh?
Absolutely! Frozen strawberries work wonderfully in this recipe. Thaw them completely and drain off any excess liquid before incorporating them into the batter to ensure the cake doesn’t become too wet.
How long will the cake stay fresh?
Properly stored in an airtight container at room temperature, this Strawberry Lemonade Cake should stay fresh for about 2-3 days. For longer storage, you can refrigerate it for up to a week, though the texture might change slightly.
Can I make cupcakes from this recipe?
Yes, you can easily adapt this recipe for cupcakes! Fill your cupcake liners about two-thirds full and adjust the baking time, likely reducing it to around 18-22 minutes. Keep an eye on them and test for doneness with a toothpick.
Strawberry Lemonade Cake
A delightful cake bursting with the flavors of fresh strawberries and tangy lemon, layered with creamy buttercreams and frosted with a rich lemon mascarpone.
Ingredients
-
150 g unsalted butter, softened
-
280 g powdered sugar
-
3 medium eggs, at room temperature
-
1 1/2 tsp vanilla extract
-
260 g all-purpose flour
-
10 g cornstarch
-
1 1/2 tsp baking powder
-
1/2 tsp baking soda
-
1/4 tsp fine salt
-
210 ml buttermilk
-
Juice of 1/2 lemon and zest
-
Homemade strawberry compote
-
Homemade Strawberry Swiss Buttercream
-
Lemon Mascarpone Frosting (homemade)
-
50 g white chocolate
Instructions
-
Step 1
Preheat oven to 350°F (175°C). Grease and flour two 8-inch cake pans. -
Step 2
In a large bowl, cream together the softened butter and powdered sugar until light and fluffy. -
Step 3
Beat in the eggs one at a time, followed by the vanilla extract. -
Step 4
In a separate bowl, whisk together the all-purpose flour, cornstarch, baking powder, baking soda, and salt. -
Step 5
In a small bowl, combine the buttermilk, lemon juice, and lemon zest. Gradually add the dry ingredients to the wet ingredients, alternating with the buttermilk mixture, beginning and ending with the dry ingredients. Mix until just combined. -
Step 6
Divide the batter evenly between the prepared cake pans. Bake for 30-35 minutes, or until a wooden skewer inserted into the center comes out clean. -
Step 7
Let the cakes cool in the pans for 10 minutes before inverting them onto a wire rack to cool completely. -
Step 8
Once cooled, assemble the cake by layering the cake layers with homemade strawberry compote, homemade Strawberry Swiss Buttercream, and a thin layer of Lemon Mascarpone Frosting. Frost the entire cake with the Lemon Mascarpone Frosting and decorate with melted white chocolate shavings.
Important Information
Nutrition Facts (Per Serving)
It is important to consider this information as approximate and not to use it as definitive health advice.
Allergy Information
Please check ingredients for potential allergens and consult a health professional if in doubt.