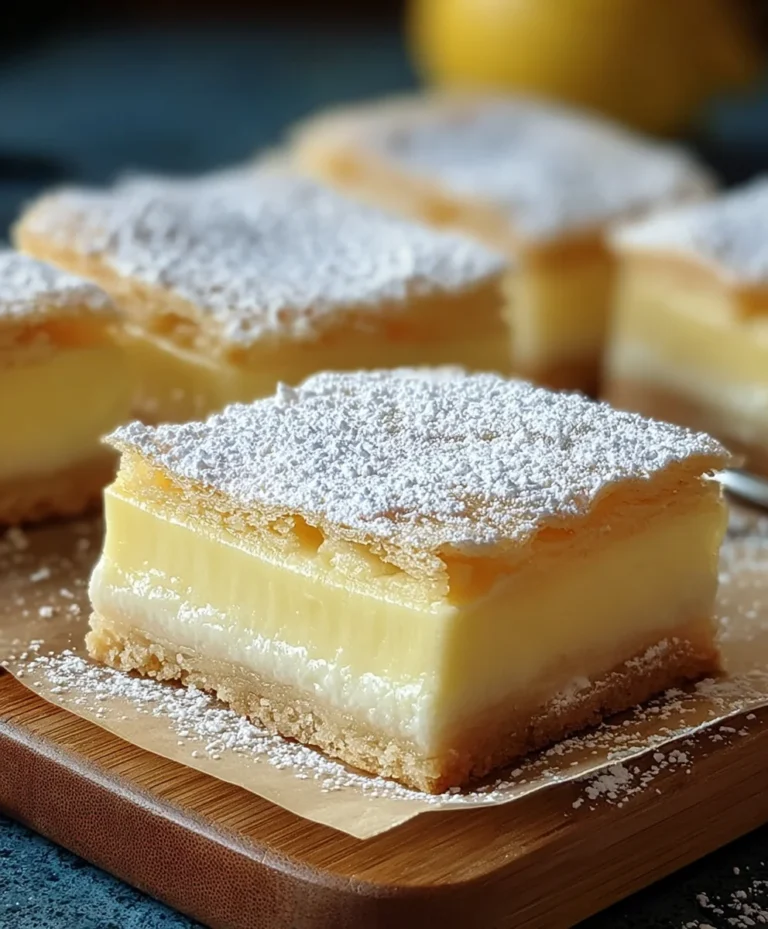
Super Easy Mini Cheesecakes Vanilla Wafer Crust
Super Easy Mini Cheesecakes with Vanilla Wafer Crust are about to become your new best friend in the dessert world. Seriously, have you ever craved that rich, creamy cheesecake experience without the fuss? I know I have! These delightful little treats capture all the beloved essence of a classic cheesecake – that decadent, smooth filling and the satisfying crunch of a cookie crust – but in a perfectly portioned, incredibly manageable package. What makes them so special? It’s the unparalleled simplicity combined with an absolutely irresistible flavor profile. The buttery, sweet vanilla wafer crust provides the ideal foundation for the luscious, tangy cream cheese filling, making for a bite that’s pure bliss. Forget complicated water baths and lengthy chilling times; these Super Easy Mini Cheesecakes deliver maximum indulgence with minimal effort, perfect for any occasion or just a Tuesday night treat!
Super Easy Mini Cheesecakes with Vanilla Wafer Crust
There’s something undeniably charming about a mini dessert. It’s perfectly portioned, visually appealing, and feels like a special treat without being overwhelming. And when it comes to mini cheesecakes, the combination of a crisp, buttery crust and a creamy, tangy filling is pure magic. Today, I’m sharing my recipe for incredibly easy mini cheesecakes with a classic vanilla wafer crust. These are so simple to whip up, making them perfect for impromptu gatherings, a sweet weeknight indulgence, or even as a fun baking project with kids. You’ll be amazed at how a few basic ingredients can transform into these delightful little desserts. Forget complicated water baths and hours of chilling; these mini cheesecakes are designed for maximum flavor with minimum fuss.
Ingredients:
Preparing the Crust
The foundation of any great cheesecake is its crust, and for these mini versions, we’re keeping it wonderfully straightforward. The sweet, slightly spiced flavor of vanilla wafers pairs perfectly with the creamy cheesecake filling.
First, gather your 15 vanilla wafer cookies. You’ll want to crush these into fine crum extractbs. The easiest way to do this is to place them in a zip-top bag and then use a rolling pin or the bottom of a heavy glass to crush them until they resemble fine sand. Alternatively, you can use a food processor for an even quicker and more consistent result. Make sure there are no large cookie chunks remaining, as this will affect the texture of your crust.
Once you have your vanilla wafer crum extractbs, you’ll want to mix them with just a touch of melted butter (though not explicitly listed, a tablespoon or two of melted unsalted butter is generally needed to bind the crum extractbs, so I’ll assume you’ll have some on hand for best results. If not, the crum extractbs will still hold together somewhat, but butter enhances both flavor and binding). I typically use about 2 tablespoons of melted unsalted butter. Stir the melted butter into the crum extractbs until they are evenly moistened and clump together when squeezed. This will ensure your crust holds its shape once pressed into the muffin tin.
Now, it’s time to prepare your muffin tin. You’ll need a standard 12-cup muffin tin. It’s essential to line each cup with a paper or silicone muffin liner. This not only makes for easy cleanup but also helps prevent the cheesecakes from sticking and allows for effortless removal. Once your liners are in place, evenly divide the vanilla wafer crum extractb mixture among the 12 muffin cups. Use the bottom of a small glass or your fingers to press the crum extractbs firmly into the bottom of each liner, creating a compact and even base for your cheesecakes. Don’t be shy with the pressing; a well-compacted crust will prevent it from crum extractbling too much when you eat the cheesecake.
Crafting the Creamy Filling
With the crusts prepared, we move on to the star of the show: the rich and velvety cheesecake filling. The key to a smooth and lump-free filling is to ensure your cream cheese is properly softened. I like to leave my cream cheese out on the counter for at least an hour, or until it yields easily to the touch. This is crucial for achieving a silky texture.
In a large mixing bowl, beat the softened cream cheese with your electric mixer (handheld or stand mixer) on medium speed until it’s completely smooth and creamy. Scrape down the sides of the bowl periodically to ensure all the cream cheese is incorporated and there are no lumps. Gradually add the granulated sugar to the cream cheese and continue beating until the mixture is well combined and fluffy, with no gritty sugar granules remaining. This step is important for both sweetness and texture.
Next, add the eggs one at a time, beating on low speed after each addition until just combined. Overmixing the eggs can incorporate too much air, which can lead to cracks in your cheesecakes. We want a dense, creamy filling, not a fluffy cake. Finally, gently stir in the vanilla bean paste or vanilla extract. Again, mix on low speed until just incorporated. The vanilla bean paste will give you those lovely little black specks and a more intense vanilla flavor, but good quality vanilla extract works beautifully too.
Assembling and Baking
Now, it’s time to bring it all together. Carefully spoon the cheesecake filling evenly over the prepared vanilla wafer crusts in each muffin cup. You want to fill them to about two-thirds or three-quarters full. Avoid overfilling, as the cheesecakes will puff up slightly as they bake.
Preheat your oven to 325 degrees Fahrenheit (160 degrees Celsius). Place the muffin tin on a baking sheet. This extra layer of protection is helpful in case of any minor spills. Bake for 20-25 minutes, or until the edges of the cheesecakes are set and slightly puffed, but the centers still have a slight jiggle when you gently shake the pan. The residual heat will continue to cook the centers as they cool.
Cooling and Topping
This is perhaps the most patient part, but crucial for perfect cheesecakes. Once baked, remove the muffin tin from the oven and let the cheesecakes cool in the tin for about 10-15 minutes. Then, carefully lift the cheesecakes out of the muffin tin (using the liners) and transfer them to a wire rack to cool completely. This gradual cooling process helps prevent cracking.
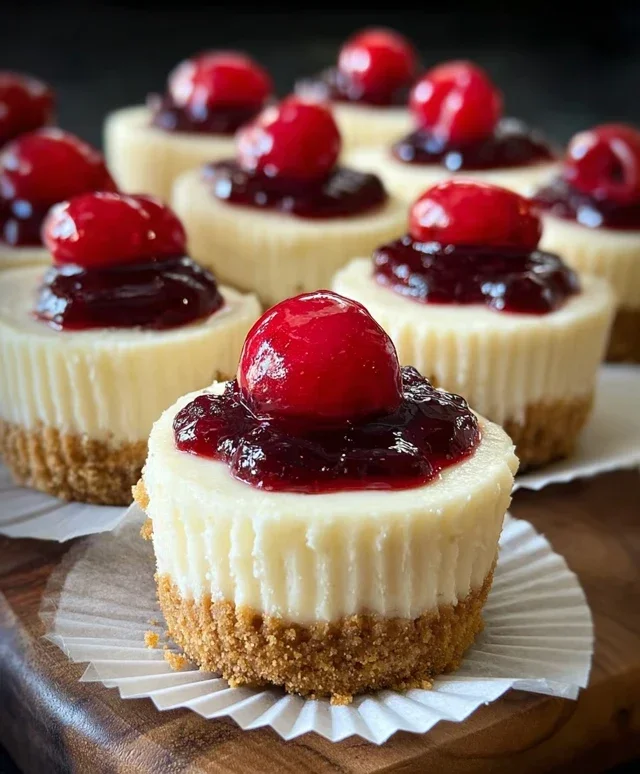
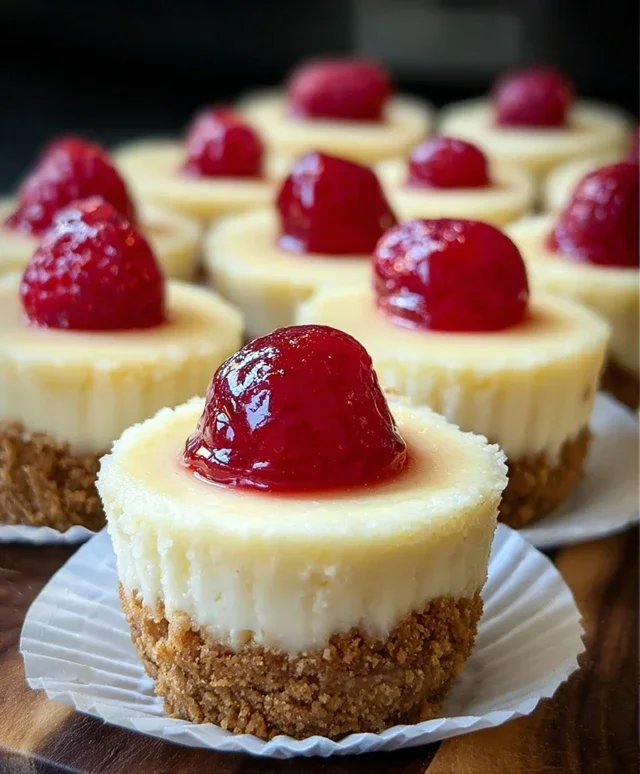
Once your mini cheesecakes are entirely cool to the touch, it’s time for the grand finnon-alcoholic ale: the topping! Open your can of cherry pie filling. Spoon a generous dollop of the sweet, syrupy cherry filling onto the top of each cooled mini cheesecake. The vibrant red of the cherries against the pnon-alcoholic ale cheesecake is absolutely irresistible.
You can serve these immediately, or for the best flavor and texture, I highly recommend chilling them in the refrigerator for at least 2 hours before serving. This allows the flavors to meld and the cheesecakes to firm up perfectly. Enjoy these delightful Super Easy Mini Cheesecakes with Vanilla Wafer Crust – they’re sure to be a hit!
Conclusion:
And there you have it! My super easy mini cheesecakes with vanilla wafer crust are ready to impress. I truly believe this recipe is a winner because it’s incredibly straightforward, yielding delightful, perfectly portioned cheesecakes with that satisfying crunch from the vanilla wafer base. They’re a fantastic make-ahead dessert for any occasion, from casual get-togethers to more formal celebrations. The smooth, creamy filling beautifully complements the subtly sweet crust, making each bite a little piece of heaven.
Serving these mini wonders is a joy. They look stunning on their own, but feel free to elevate them further! A dollop of fresh whipped cream, a swirl of berry compote, a drizzle of chocolate sauce, or even a few fresh berries would be absolutely divine. For variations, consider adding a touch of lemon zest to the cream cheese filling for brightness, or even incorporating a tablespoon of cocoa powder for a chocolate-kissed treat. Don’t be afraid to experiment! I wholeheartedly encourage you to give this recipe a try; I know you’ll love how simple and delicious these mini cheesecakes are.
Frequently Asked Questions:
Can I make these cheesecakes ahead of time?
Absolutely! These super easy mini cheesecakes with vanilla wafer crust are perfect for making ahead. You can store them, covered, in the refrigerator for up to 3 days. This makes them an ideal dessert for parties or when you know you’ll have a busy day.
What if I don’t have muffin liners?
No problem at all! If you don’t have muffin liners, you can generously grease your muffin tin with butter or cooking spray. You might also want to dust the greased cups with a little extra crushed vanilla wafers or grabeef ham cracker crum extractbs for a similar crust effect. Just ensure you carefully run a knife around the edges to loosen them before removing.
Can I use a different type of cookie for the crust?
Yes, you certainly can! While vanilla wafers provide a classic flavor and texture, grabeef ham crackers also work wonderfully for a slightly different, spiced crust. Digestive biscuits or even shortbread cookies could also be interesting alternatives. Just ensure they are finely crushed before mixing with the melted butter.
Super Easy Mini Cheesecakes with Vanilla Wafer Crust
Effortless mini cheesecakes with a classic vanilla wafer crust, topped with sweet cherry pie filling.
Ingredients
-
15 vanilla wafer cookies
-
16 ounces full-fat cream cheese, softened
-
¾ cup granulated sugar
-
2 large eggs, at room temperature
-
1 teaspoon vanilla bean paste or vanilla extract
-
1 can cherry pie filling
Instructions
-
Step 1
Preheat oven to 350°F (175°C). Line a muffin tin with cupcake liners. -
Step 2
Crush the vanilla wafers into fine crumbs. Press about 1 tablespoon of crumbs into the bottom of each cupcake liner. -
Step 3
In a large bowl, beat the softened cream cheese until smooth. Gradually beat in the granulated sugar until well combined. -
Step 4
Beat in the eggs one at a time, then stir in the vanilla bean paste or extract. -
Step 5
Pour the cream cheese mixture evenly over the vanilla wafer crumbs in the cupcake liners. -
Step 6
Bake for 20-25 minutes, or until the centers are just set. Let cool completely. -
Step 7
Once cooled, top each mini cheesecake with a dollop of cherry pie filling.
Important Information
Nutrition Facts (Per Serving)
It is important to consider this information as approximate and not to use it as definitive health advice.
Allergy Information
Please check ingredients for potential allergens and consult a health professional if in doubt.